


How to Configure AWS Organization
In this tutorial, you will learn how to structure your AWS accounts hierarchically, apply organization and account-level security policies, set service and budget limits, and enable auditing and monitoring functions.
Neglecting this configuration could result in less efficient and more complex management of AWS accounts. Without the organizational structure provided by AWS Organizations, AWS accounts would operate independently, making it difficult to implement consistent security and access policies, centralized financial management, and collaboration between accounts.
While this flow is entirely optional, we recommend following it before starting console configuration to improve the long-term experience of our users at C4C7OPS.
We can divide this configuration into five important points to facilitate the process:
- Configure AWS Organization
- Configure Google Single Sign-On (SSO)
- Configure SSO Link
- Configure Groups in AWS
- Configure Permission Groups for Users in AWS
1. Configure AWS Organization
AWS Organizations allows you to manage and organize multiple AWS accounts under a single entity. This can be useful for centralizing resource management, implementing security and compliance policies, and simplifying billing.
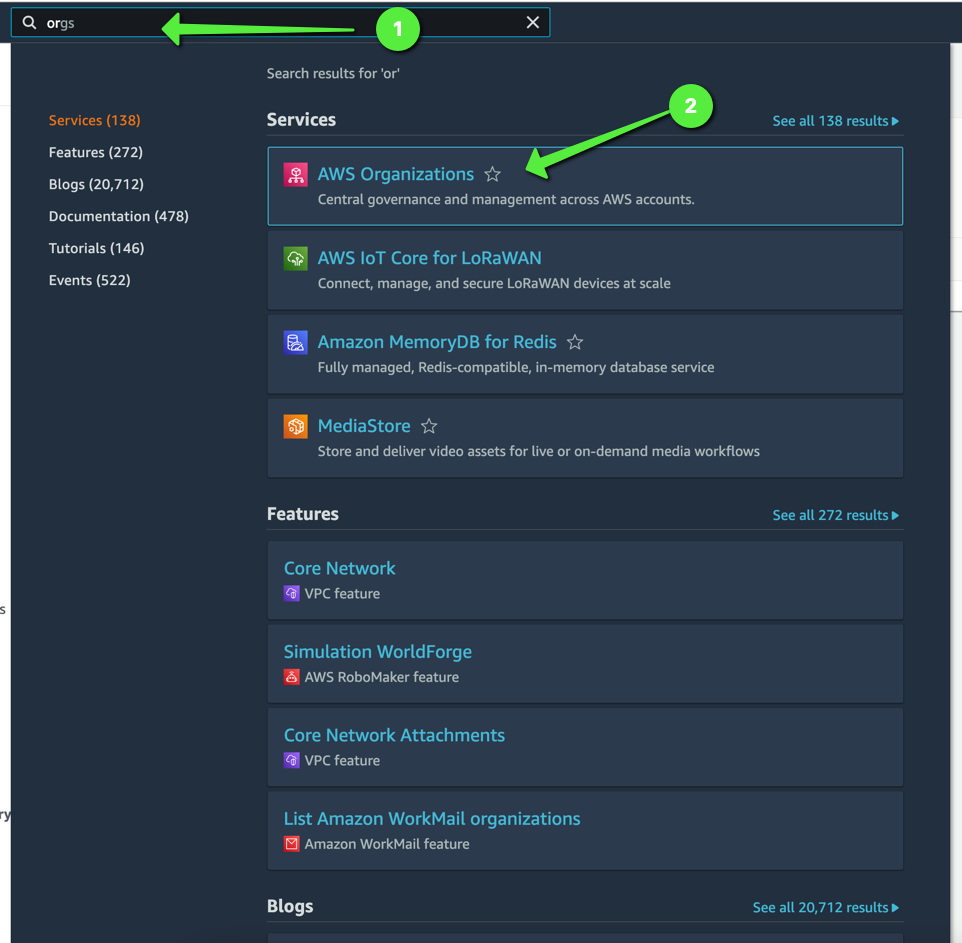
1.1 Go to the "organization" section in AWS.
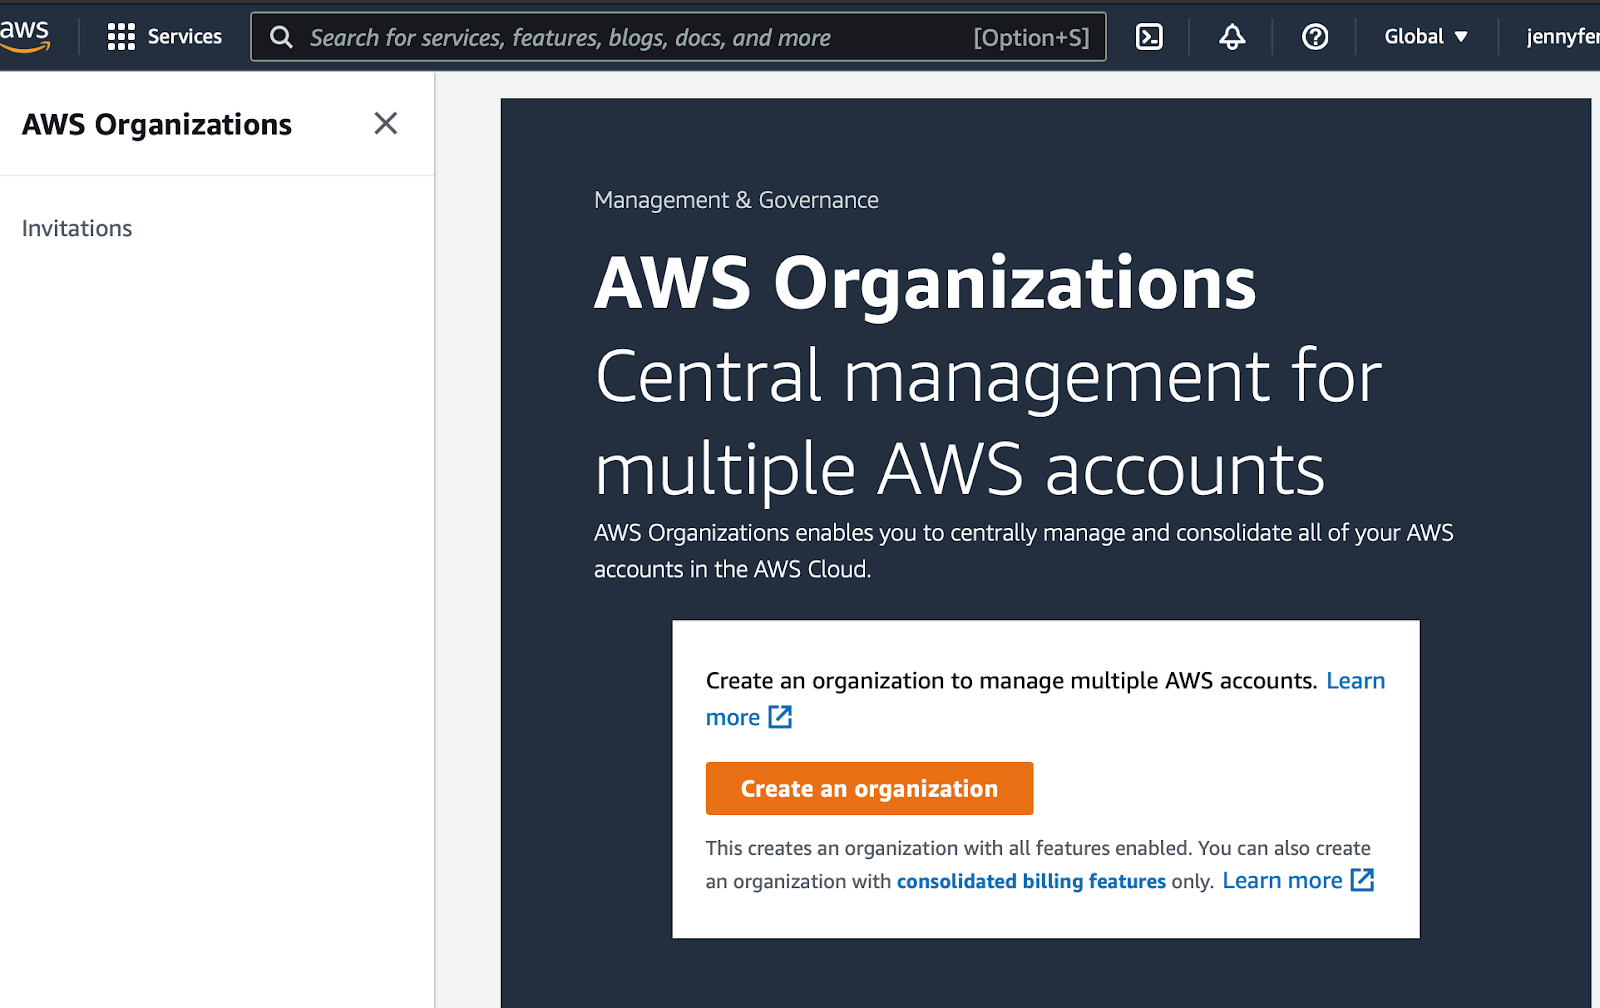
1.2 Click on the button to create an organization.
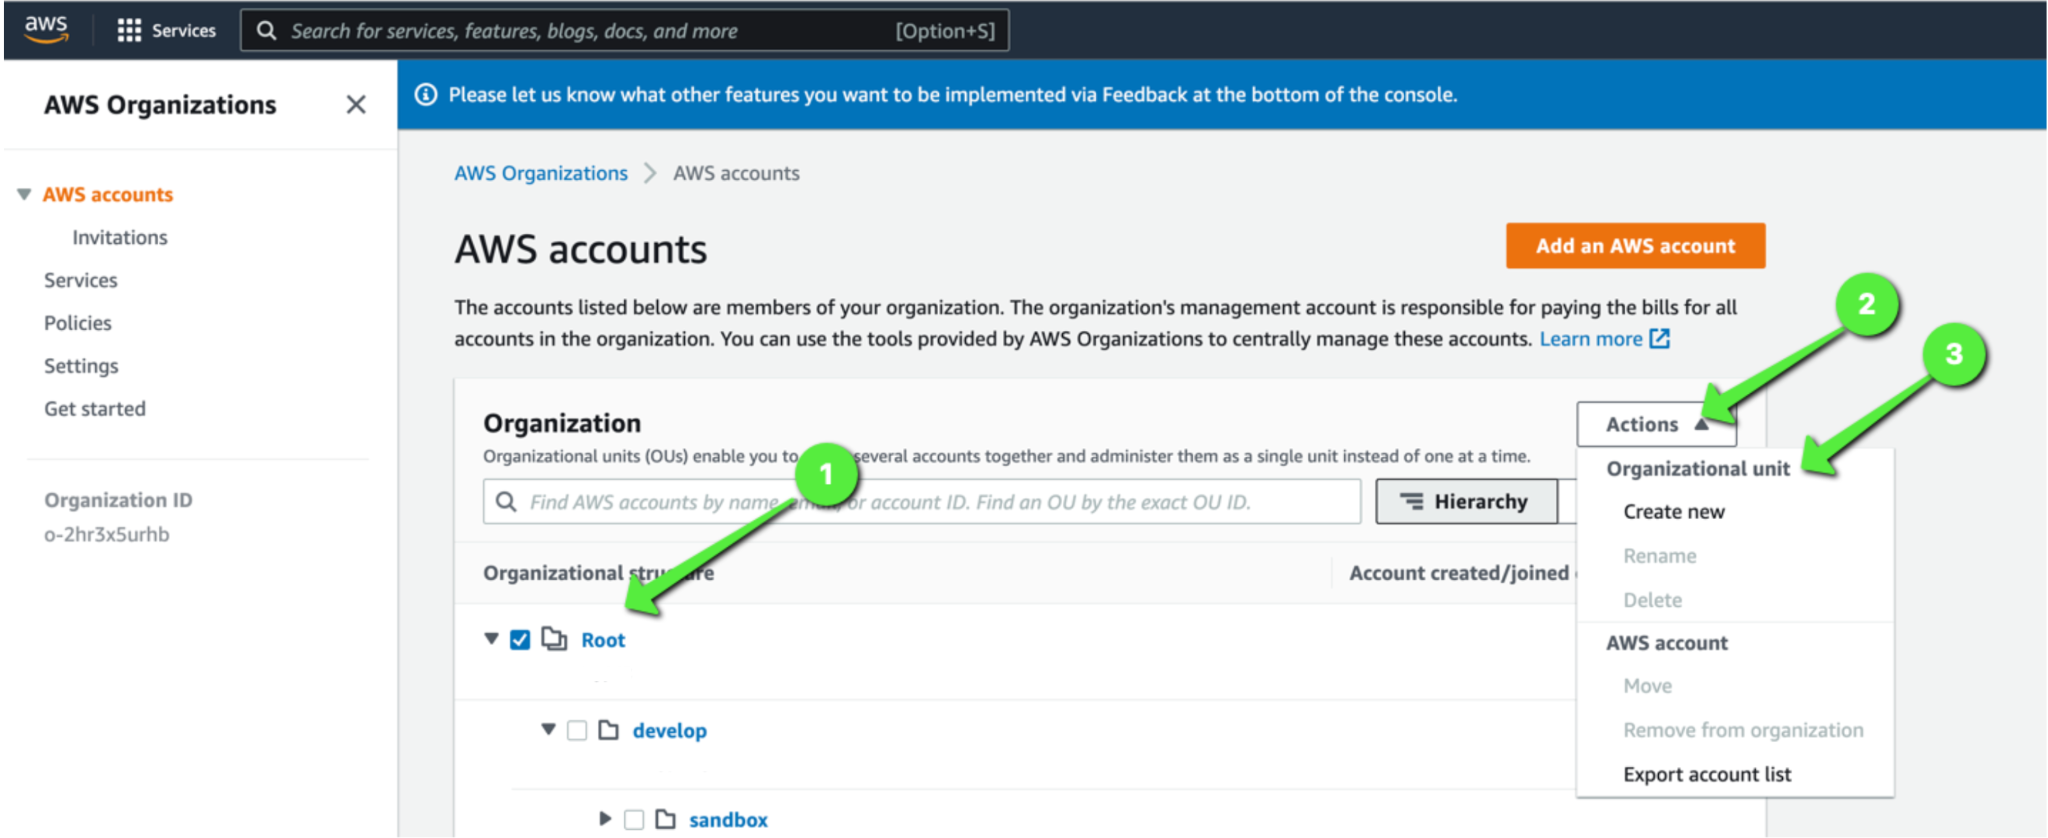
1.3 Select the default organization "root", click on "actions", and then "create new".
In this step, we will create "organizational units" for our architecture.
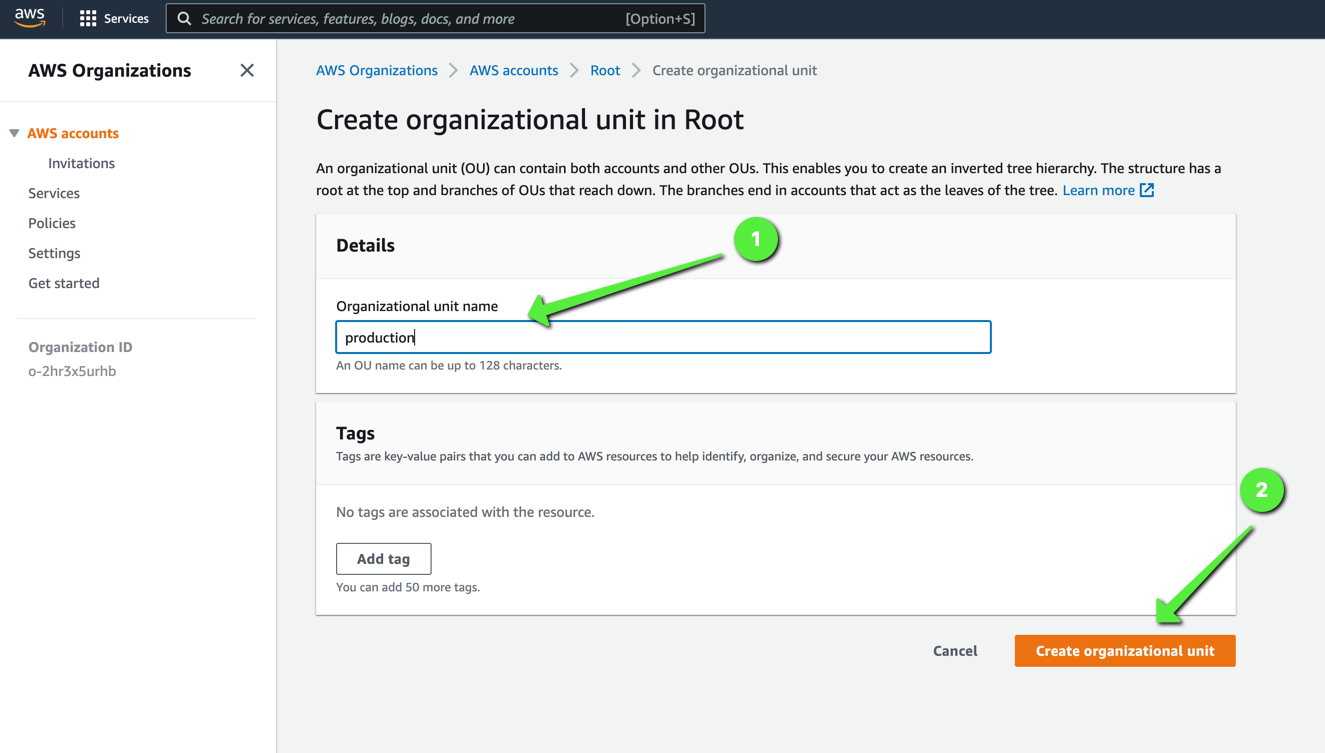
1.4 Assign a name depending on the purpose of our "organizational unit".
At this point, we should consider certain recommendations for the names. From C4C7OPS, we recommend the following pattern:
- production: Here will live the final result of our applications
- develop: Here will live development versions of our applications for testing and deployment requirements.
- sandbox: Here developers can do proof of concept and more to eventually be eliminated and not "dirty" our versioned environments.
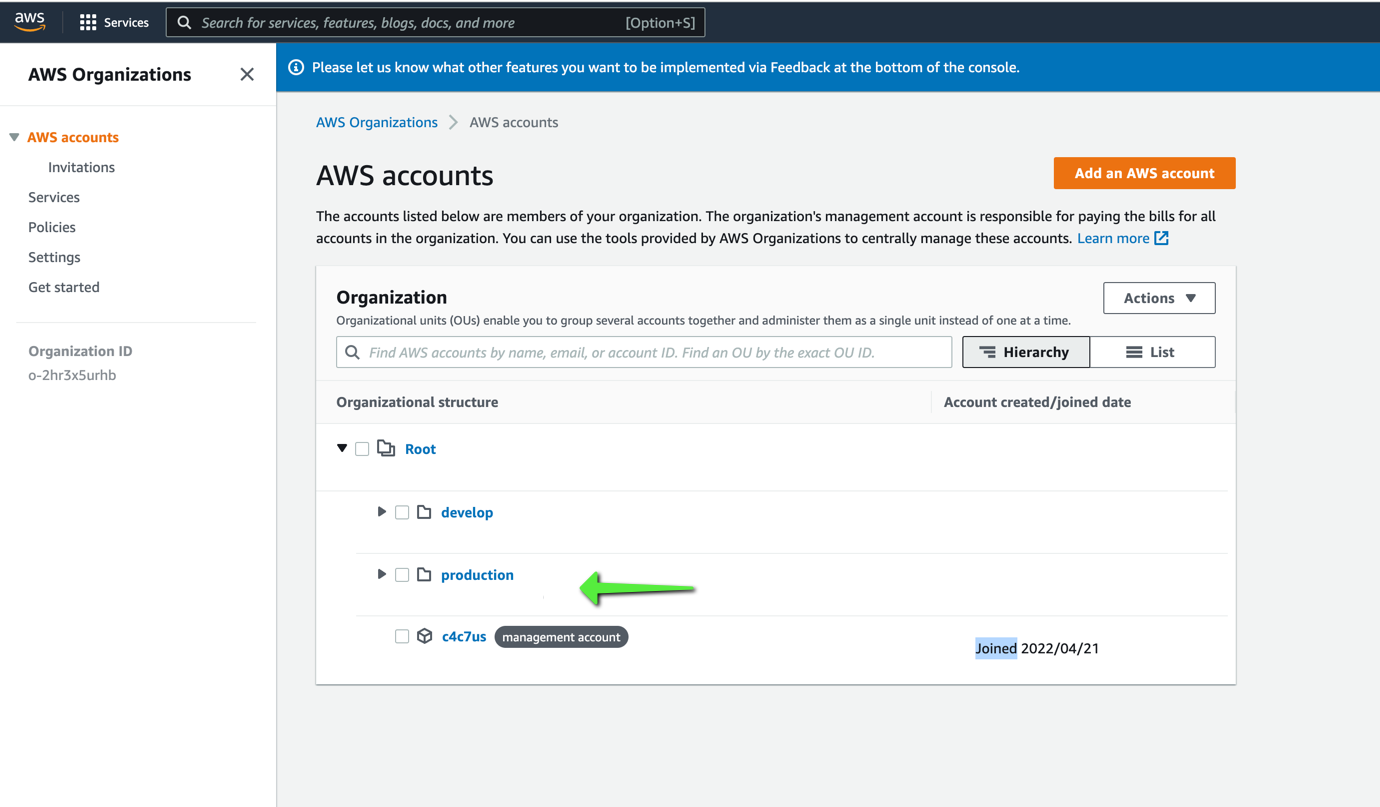
1.5 Then we proceed to create our accounts.
For this, we recommend using a single email and assigning aliases for each account, as in the following example (Gmail).
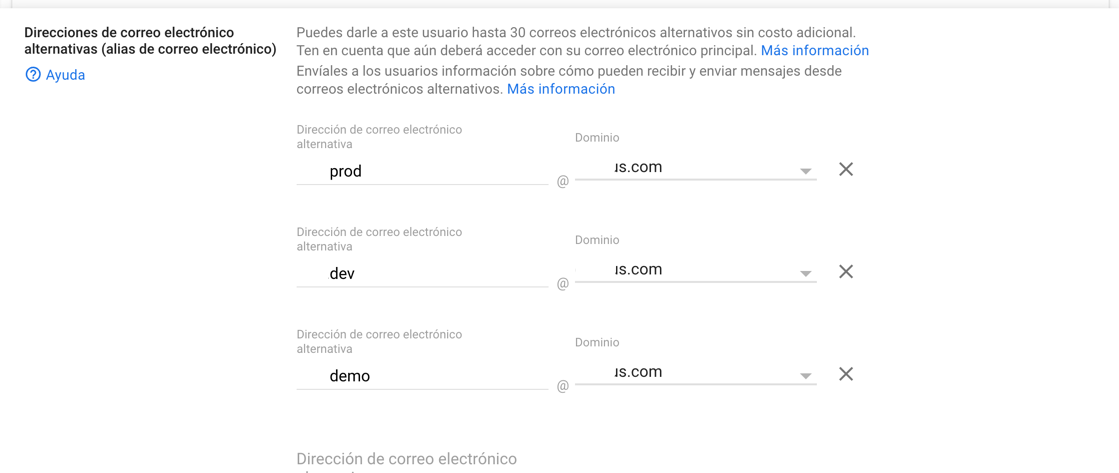
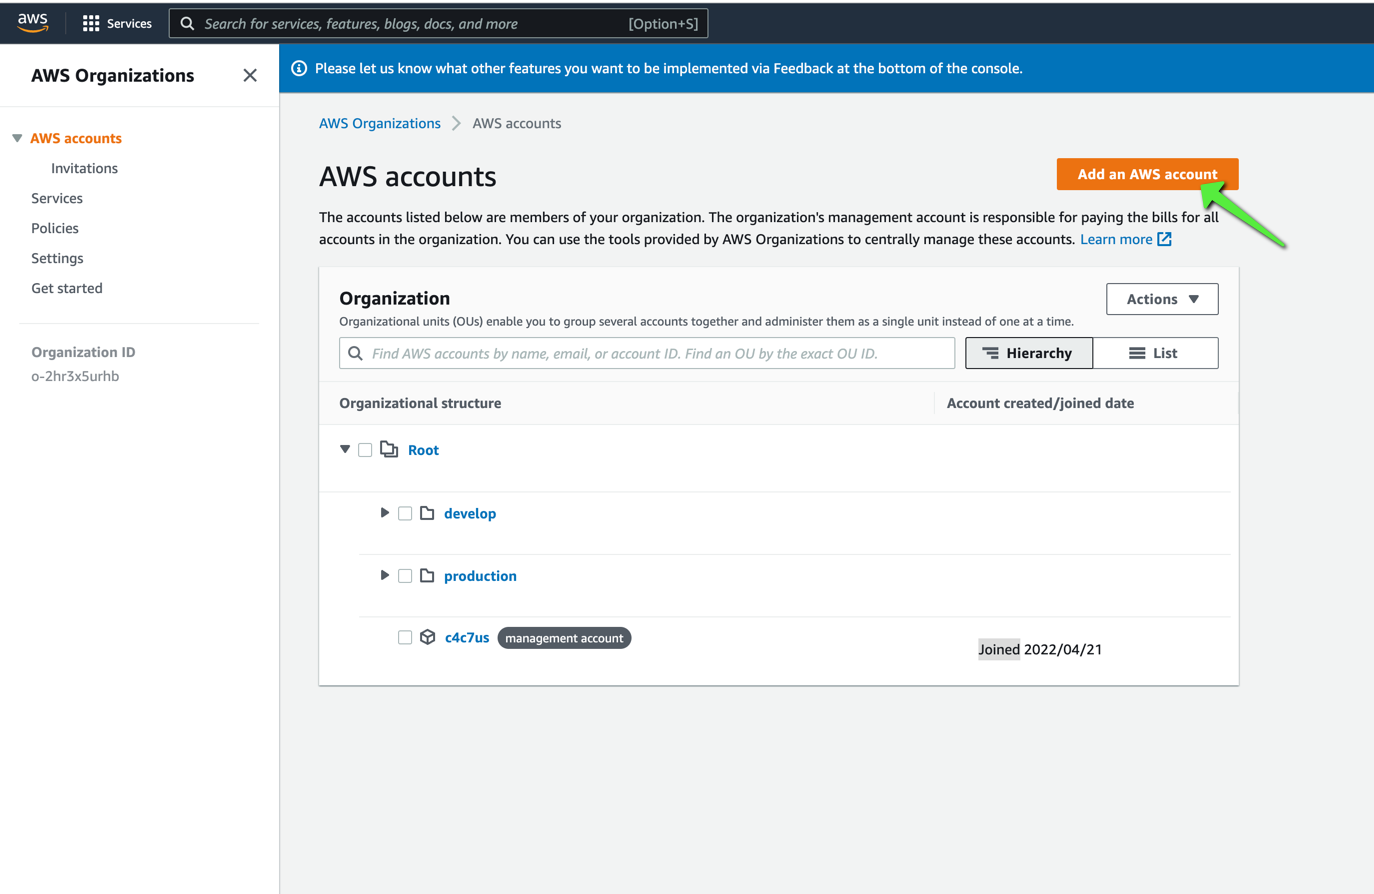
1.6 Return to AWS Organization and click on "Add an AWS Account".
1.7 Fill out the fields:
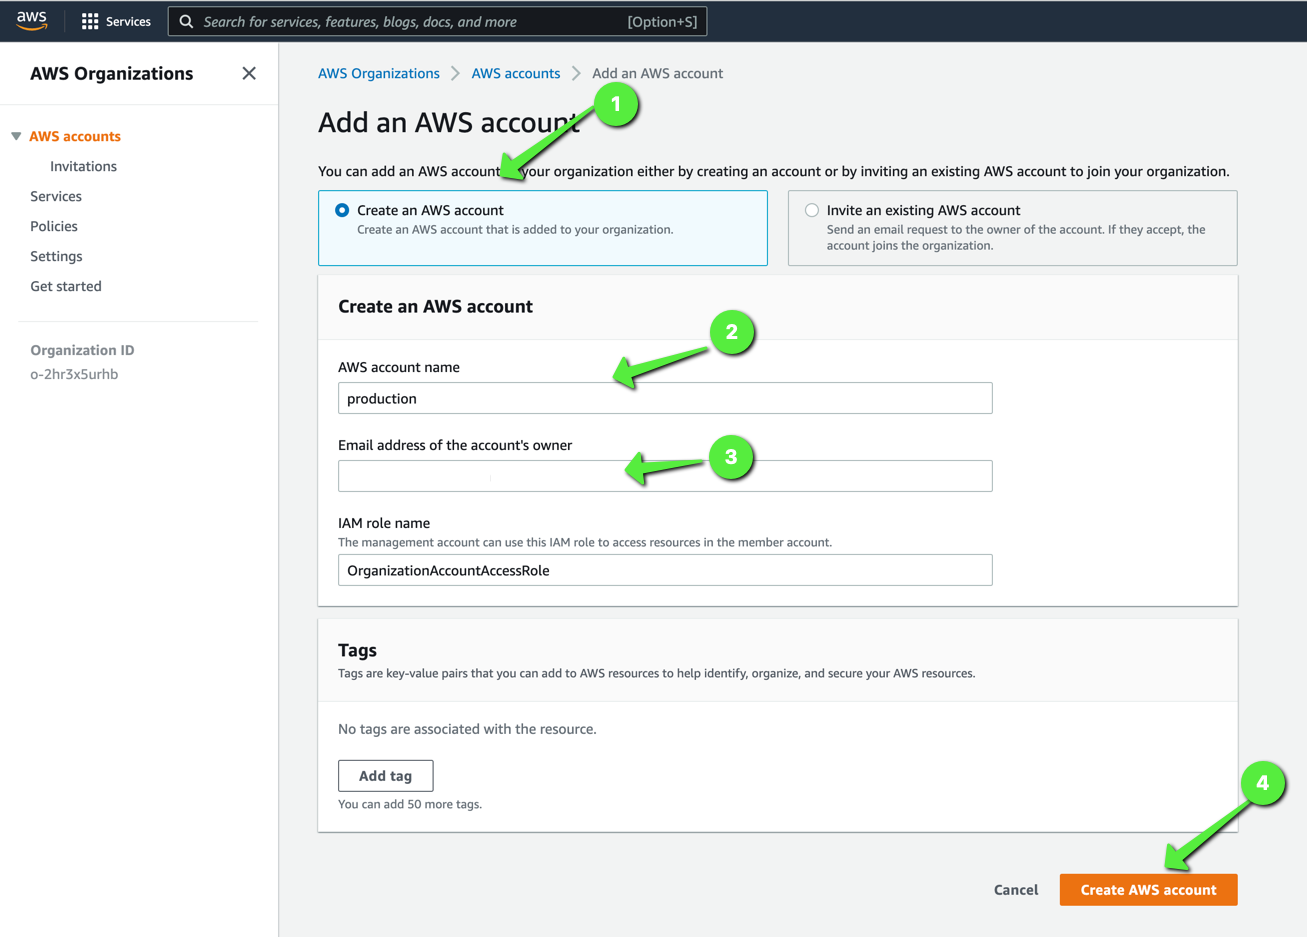
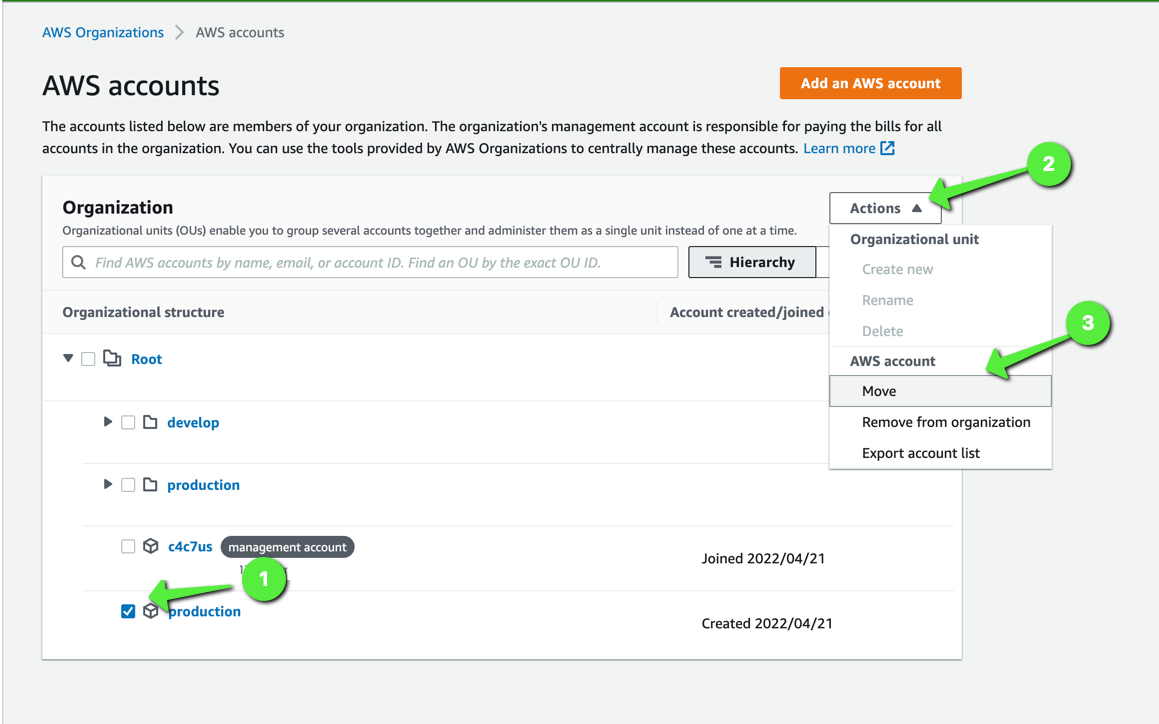
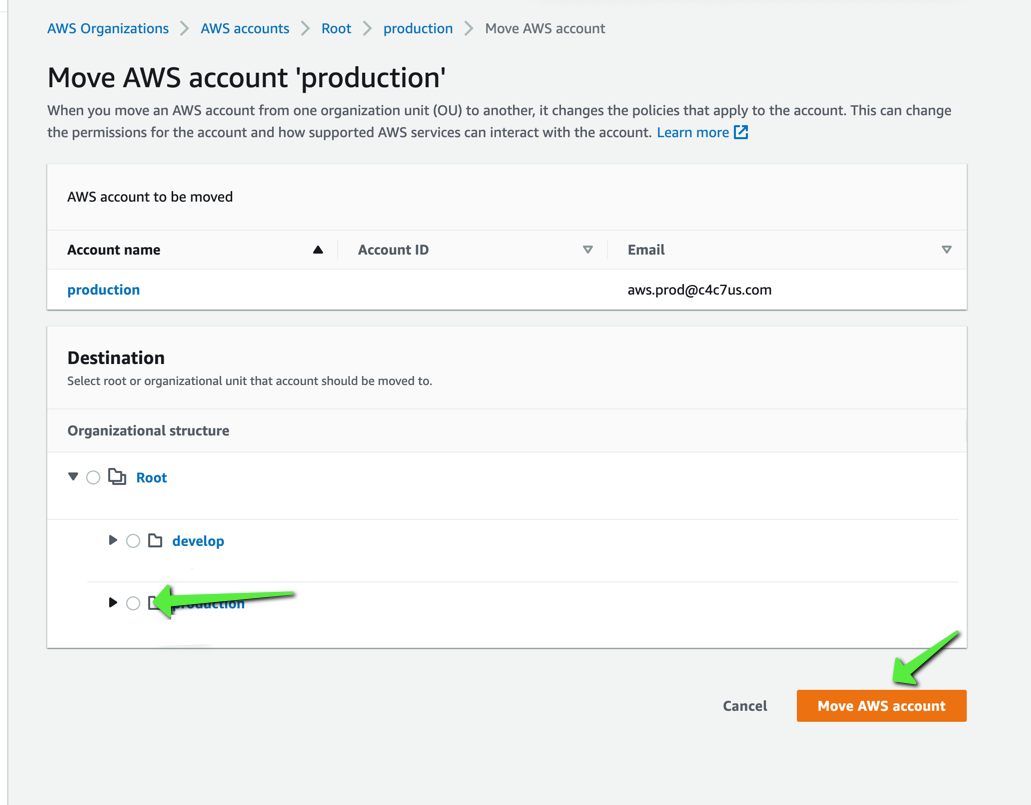
1.8 Move the "AWS Account" into its respective "organizational unit" and repeat the process with all the "organizational units".
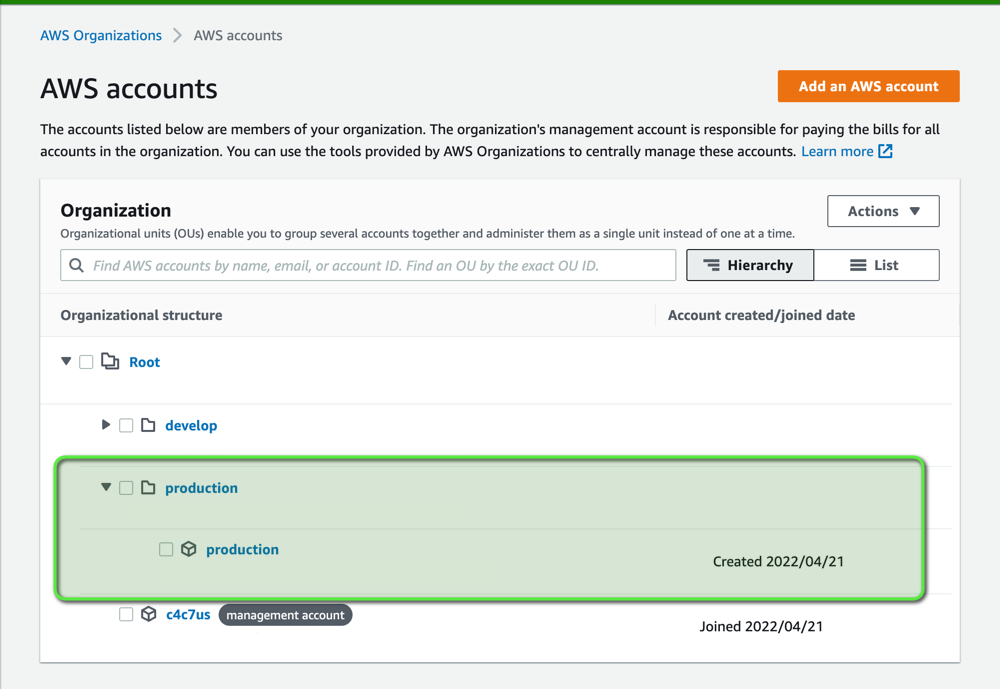
This would be our result:
2. Configure Google Single Sign-On (SSO)
Configuring Google Single Sign-On (SSO) involves some key steps to integrate Google authentication into AWS. As a recommendation, perform all this configuration on the Oregon region (Virginia is much more unstable).
2.1 Go to SSO in AWS.
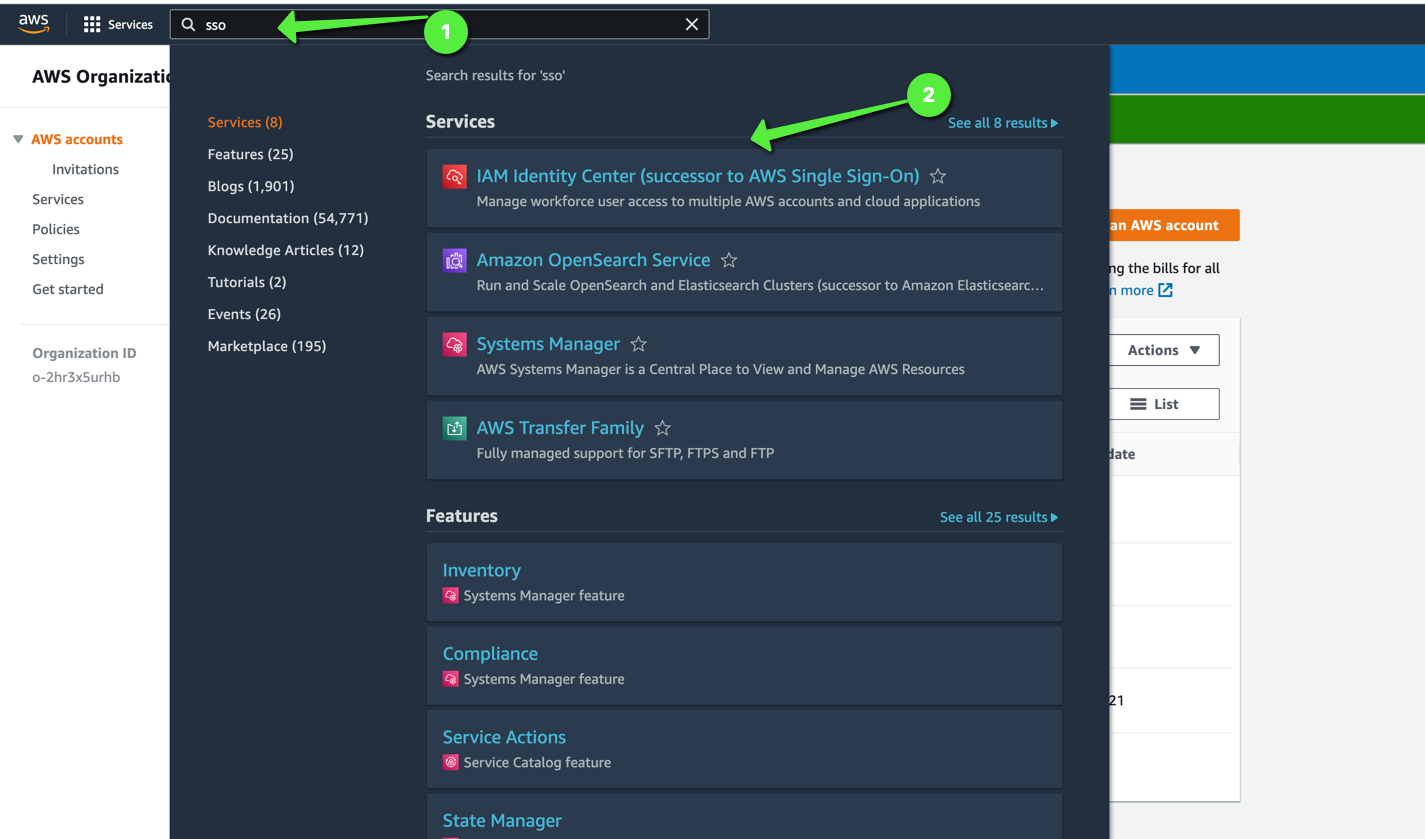
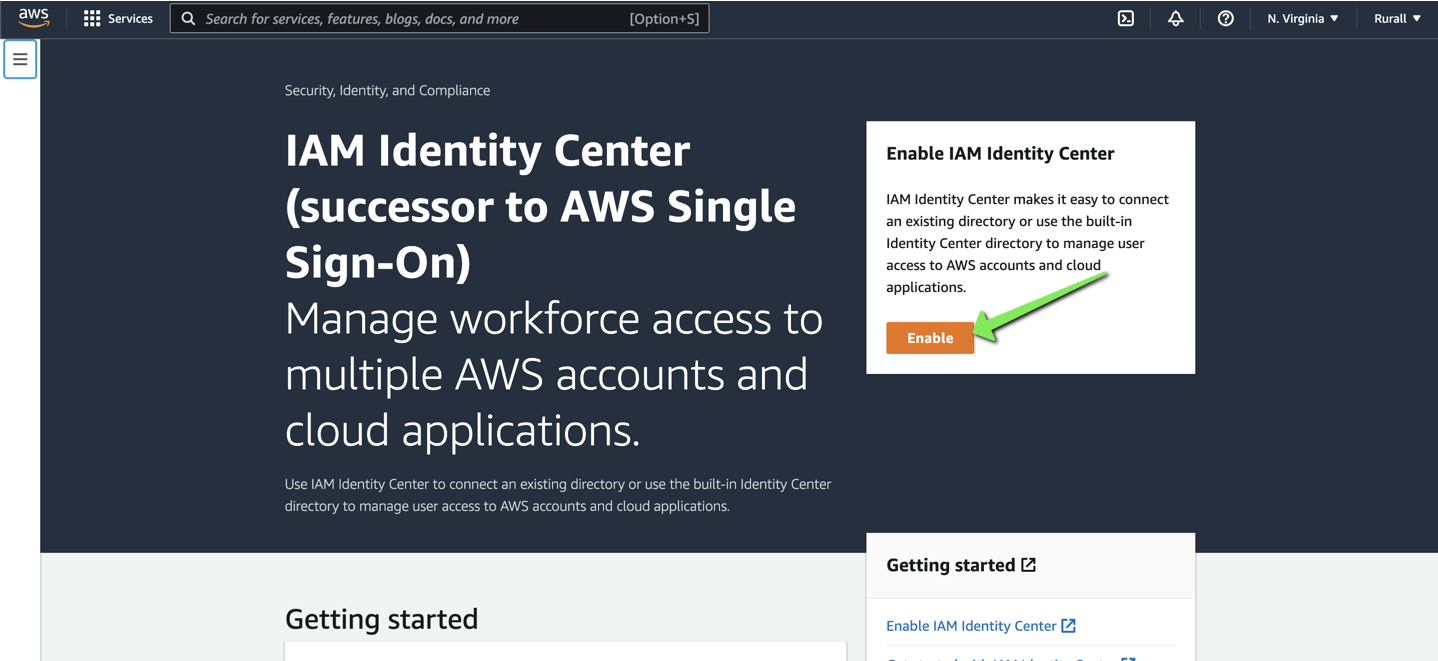
2.2 If it has not been enabled, the following screen will appear, click on "Enable".
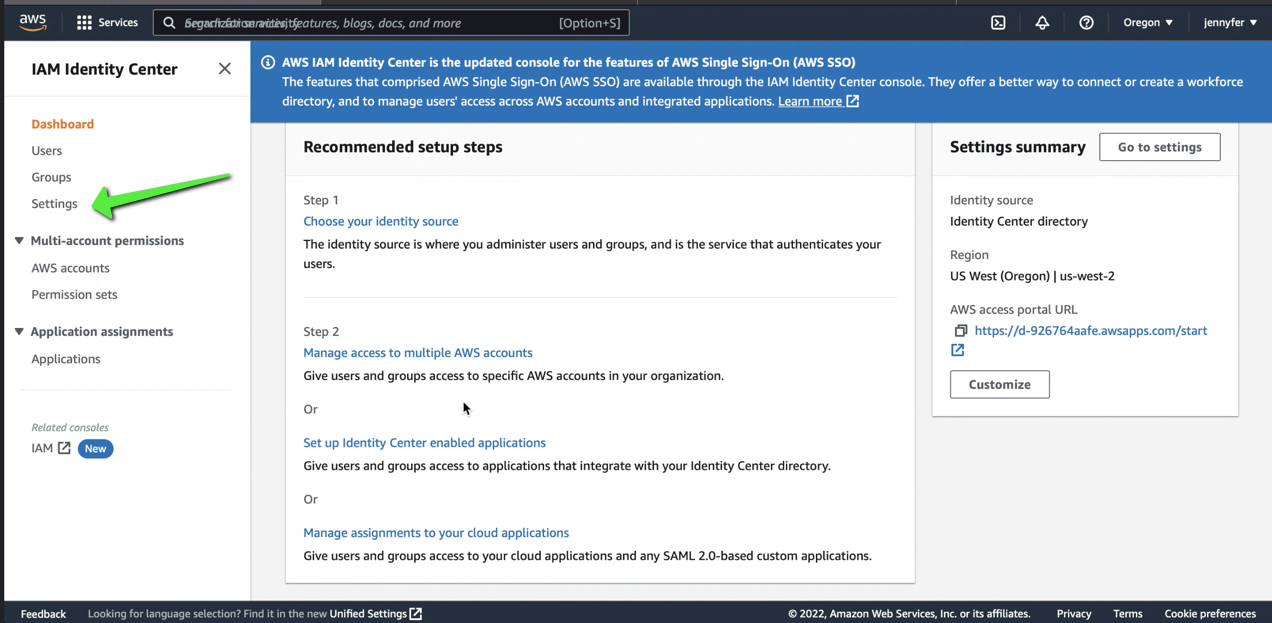
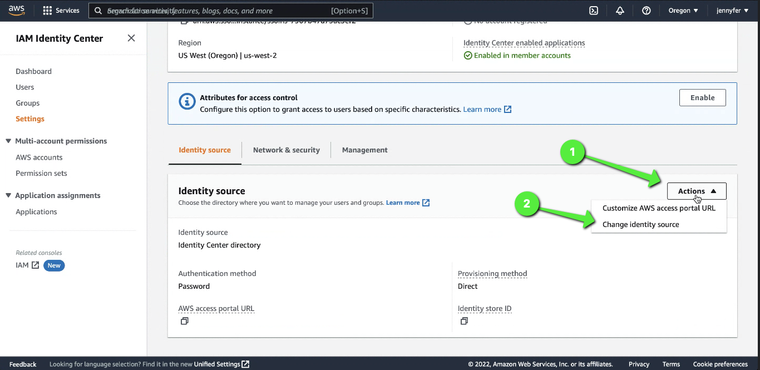
2.3 Click on "Settings", then on "Actions", and on "Change identity source".
2.4 Select "External Identity Provider" and click on "Next".
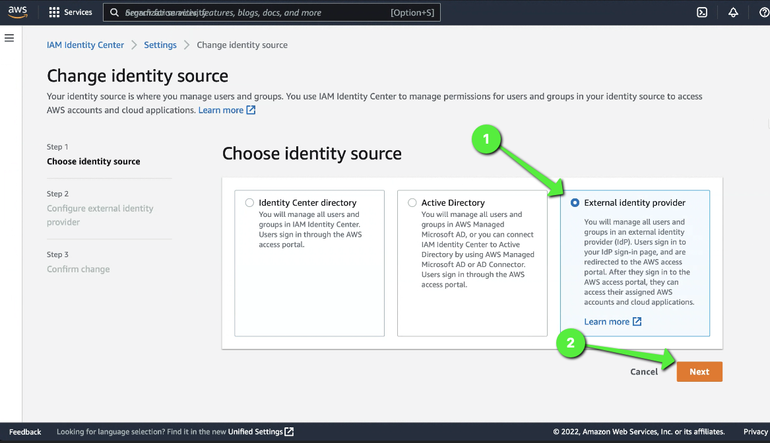
After this last step, we will stay on this screen and simultaneously we will generate an AWS SAML application on Google.
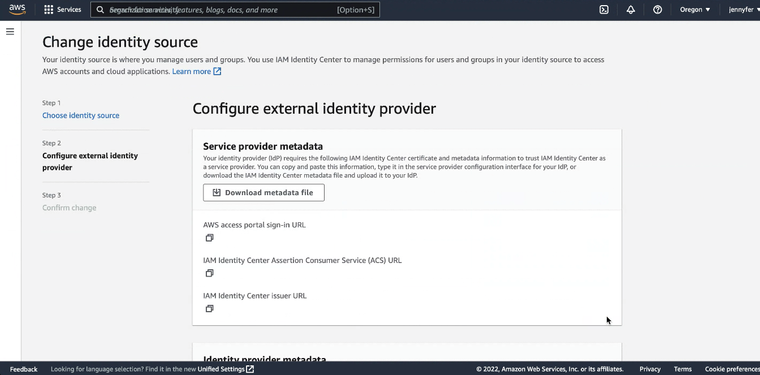
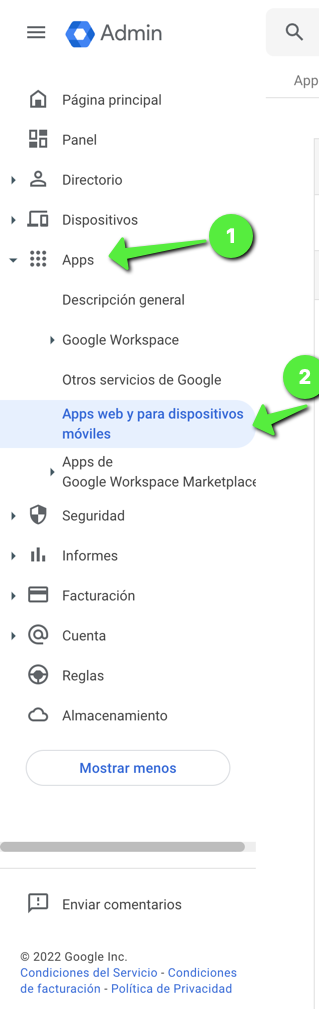
2.5 Go to the options of the Google admin console, select "Apps", and "Web and mobile apps".
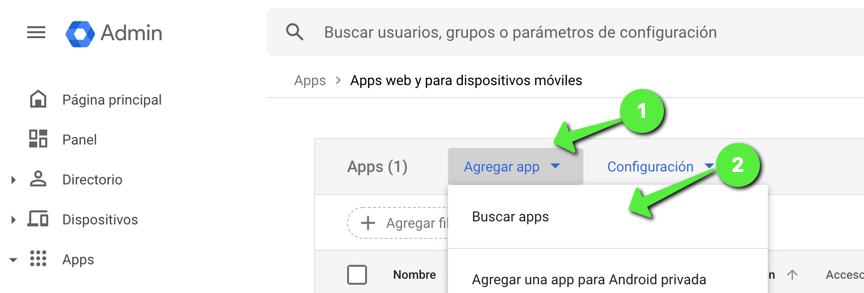
2.6 Click on "Add app" and then on "Search apps".
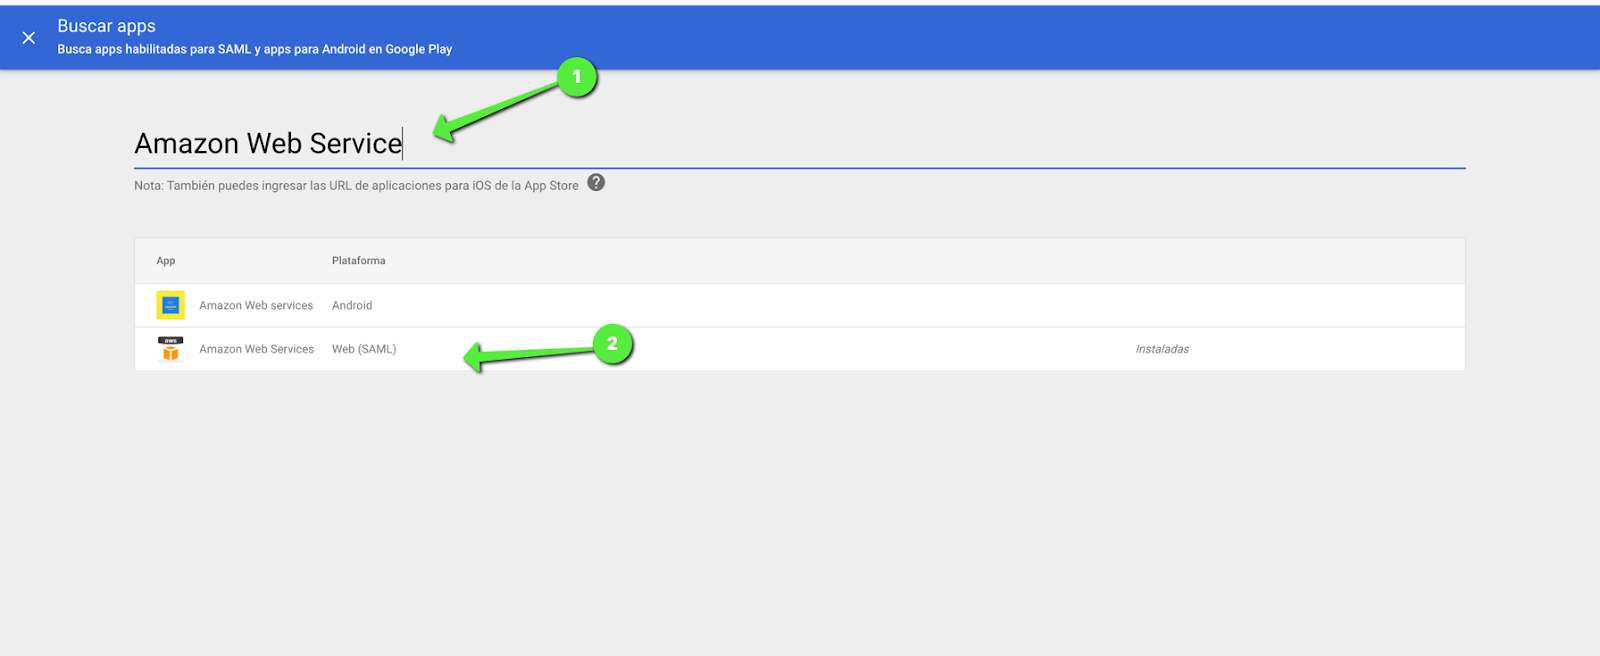
2.7 Search for "Amazon Web Service" and select the "Web (SAML)" option.
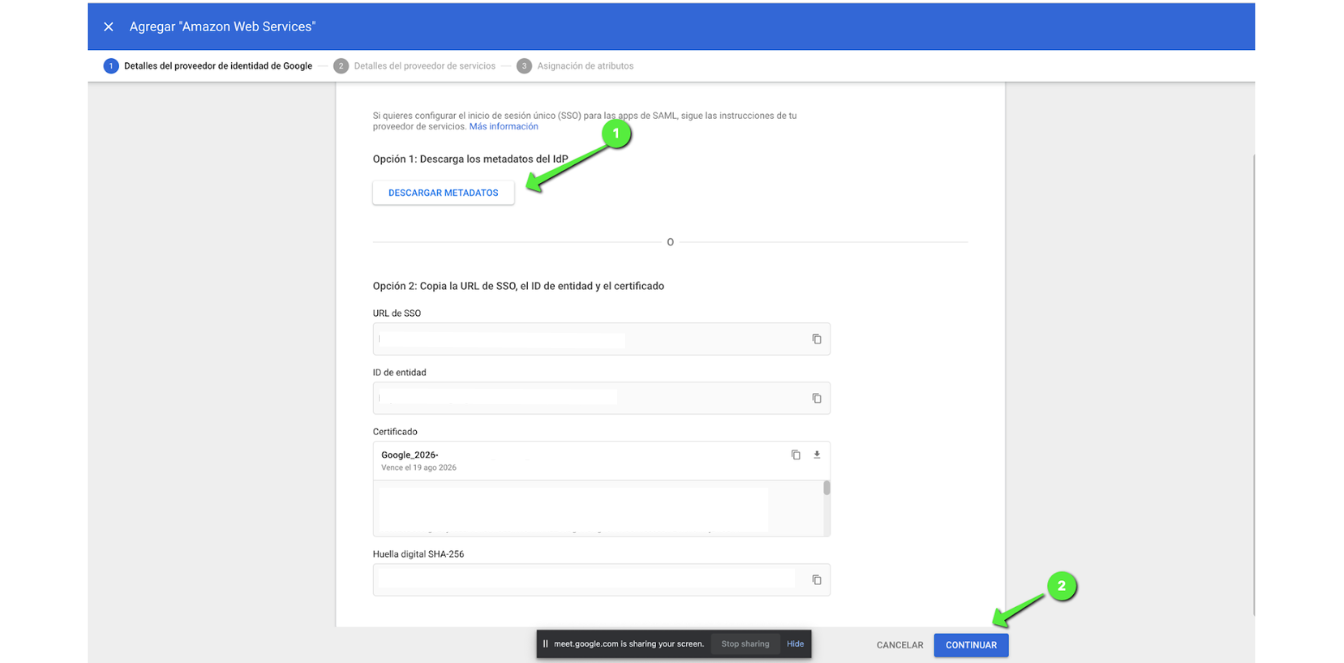
2.8 Click on "Download metadata" and then on "Continue".
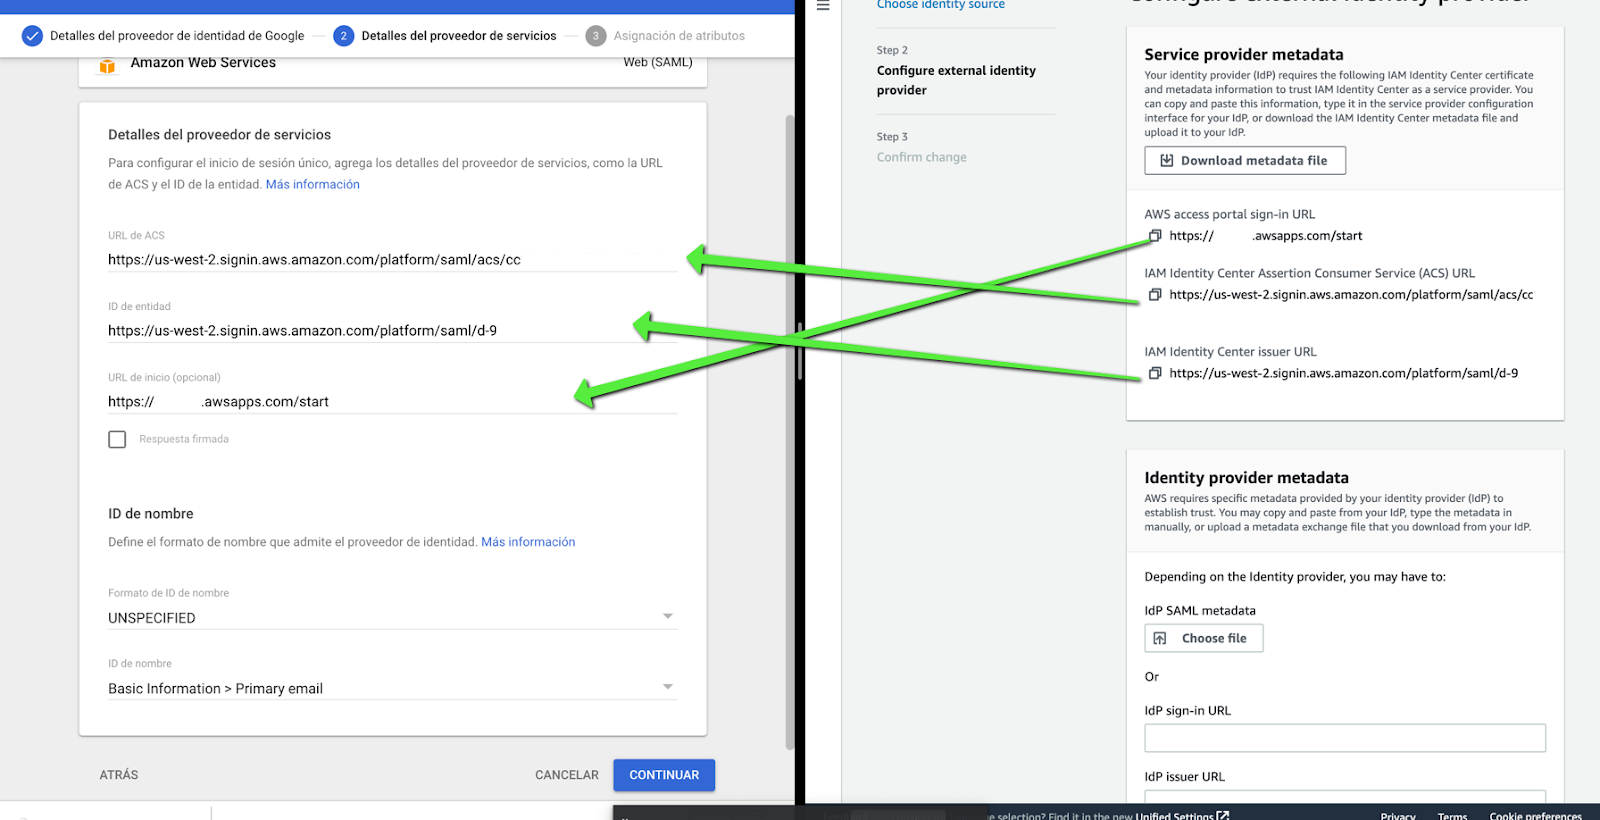
2.9 Copy our AWS access keys, fill in the fields, and continue.
Note: Do not close the AWS tab yet after completing the configuration.
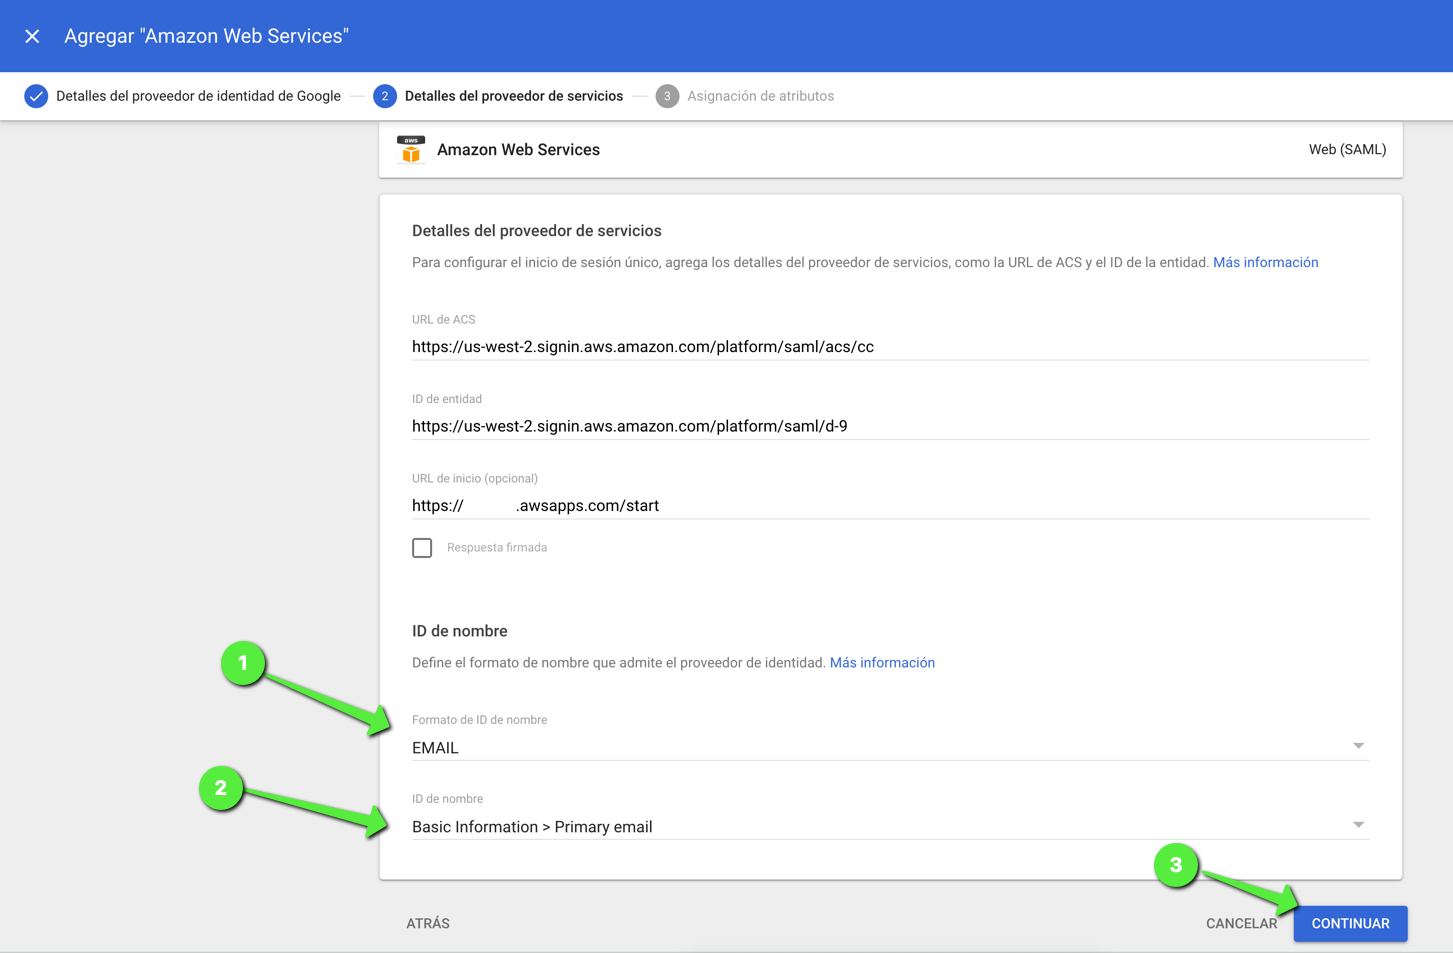
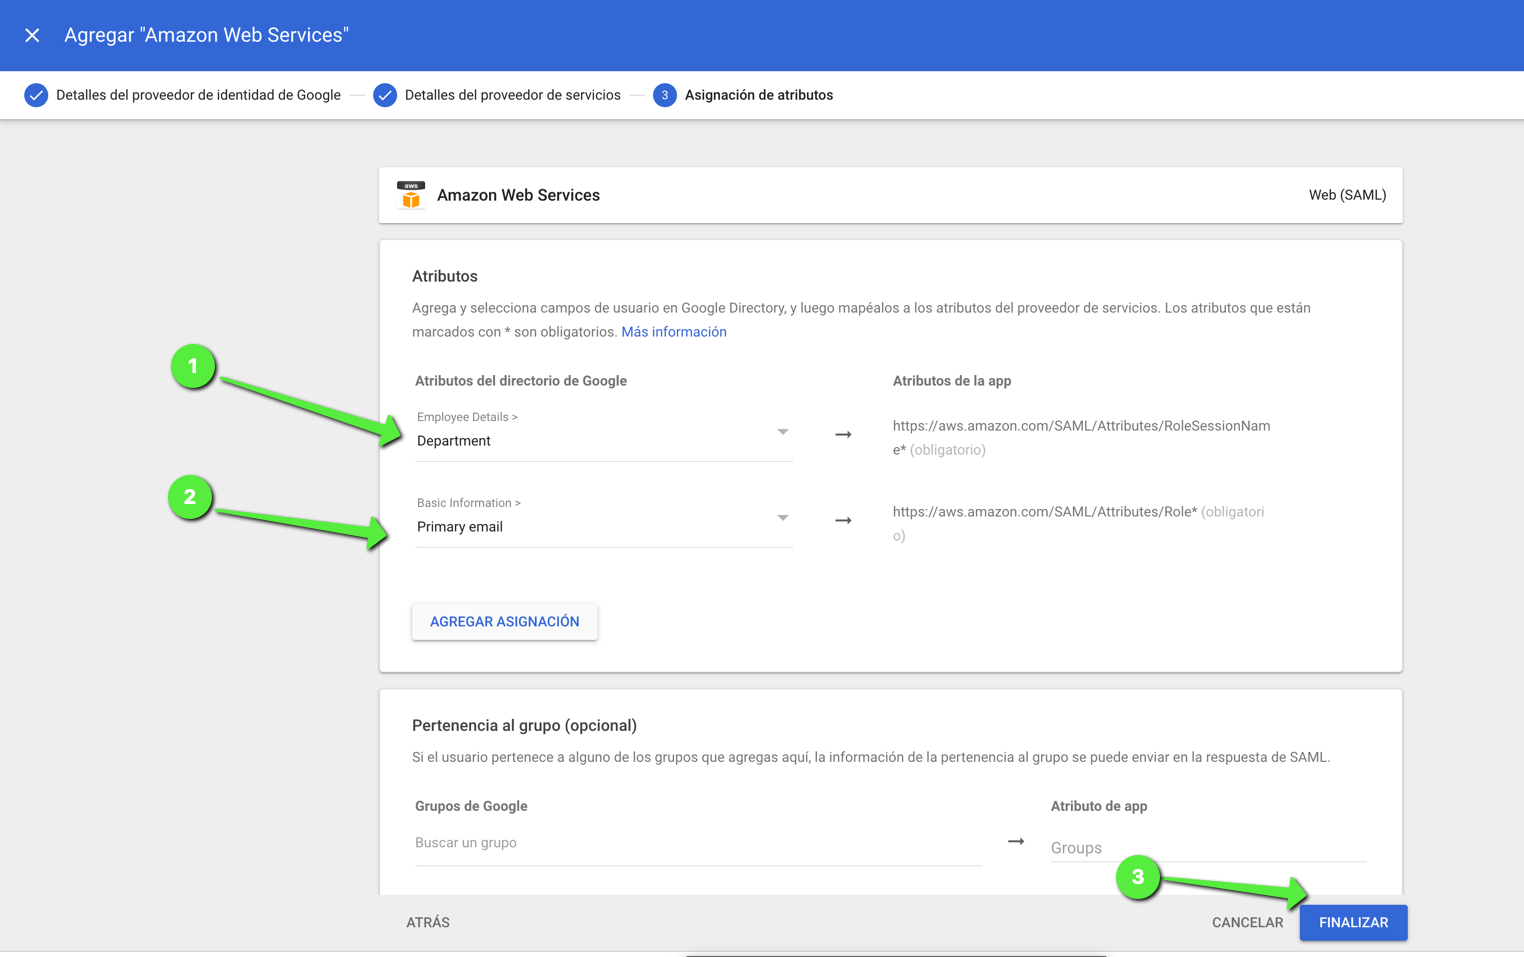
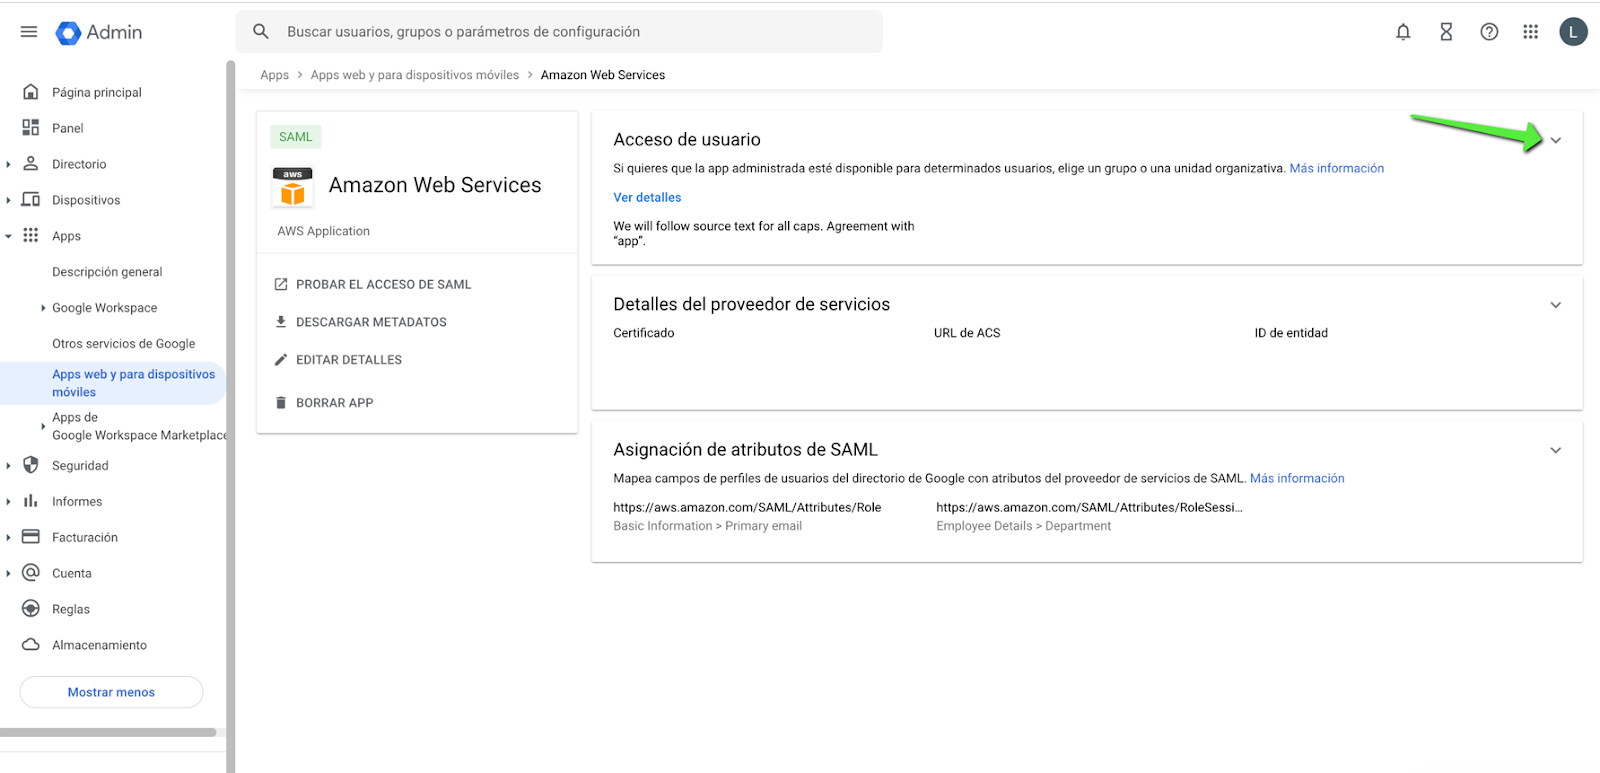
2.10 Go back to the Google Admin Console options, select "Apps" and "Web and mobile apps", and search for the AWS app we installed.
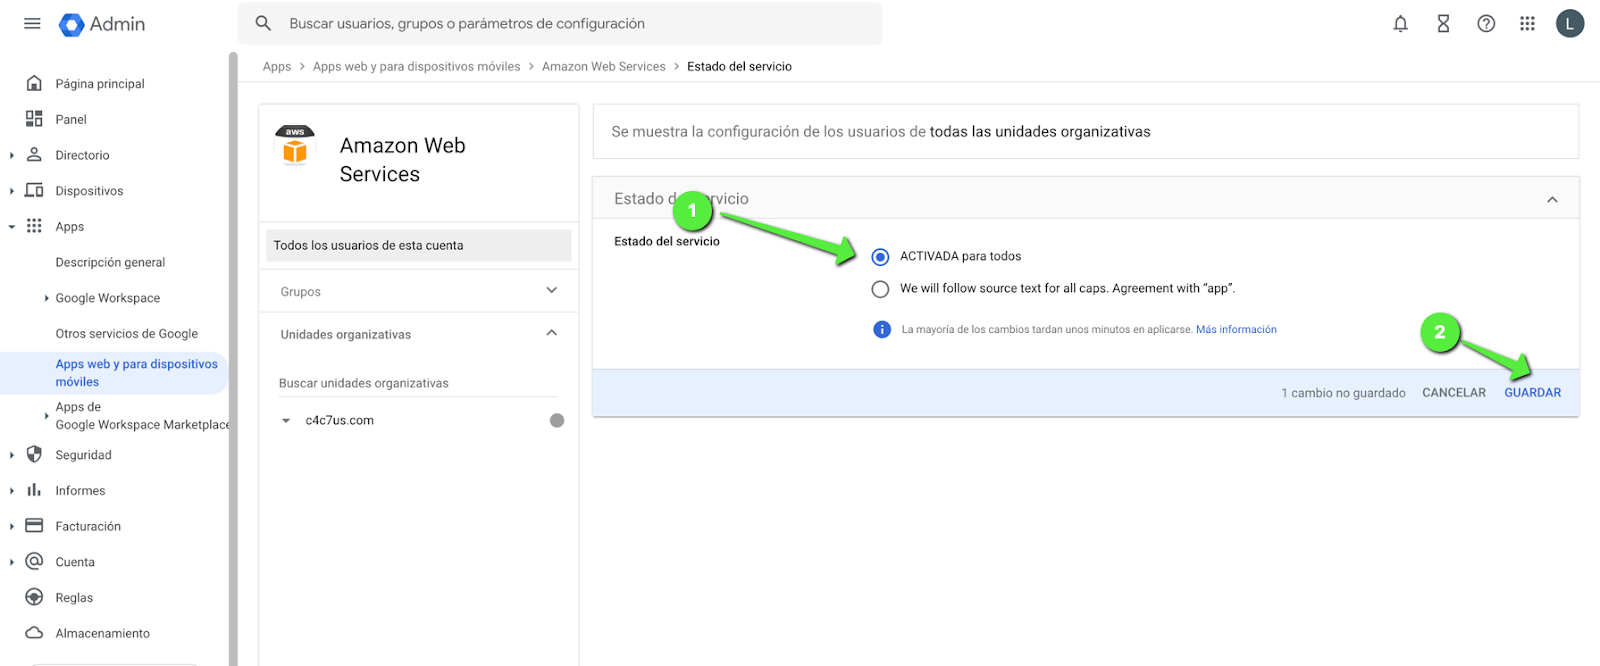
Expand the access options and enable the "ON for everyone" option and save.
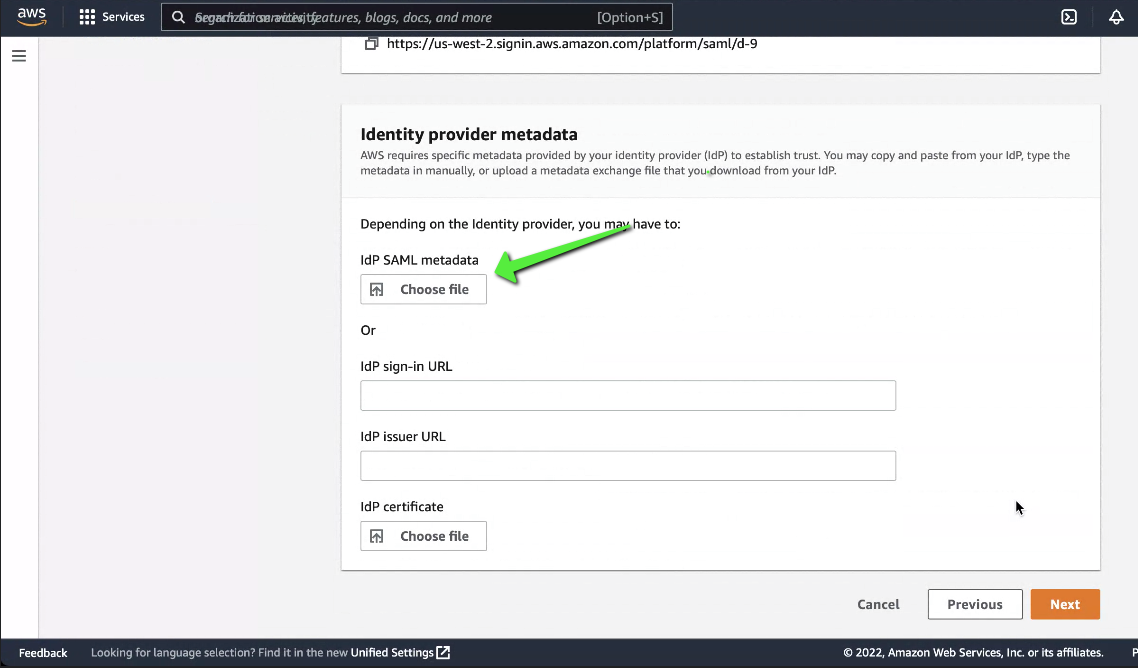
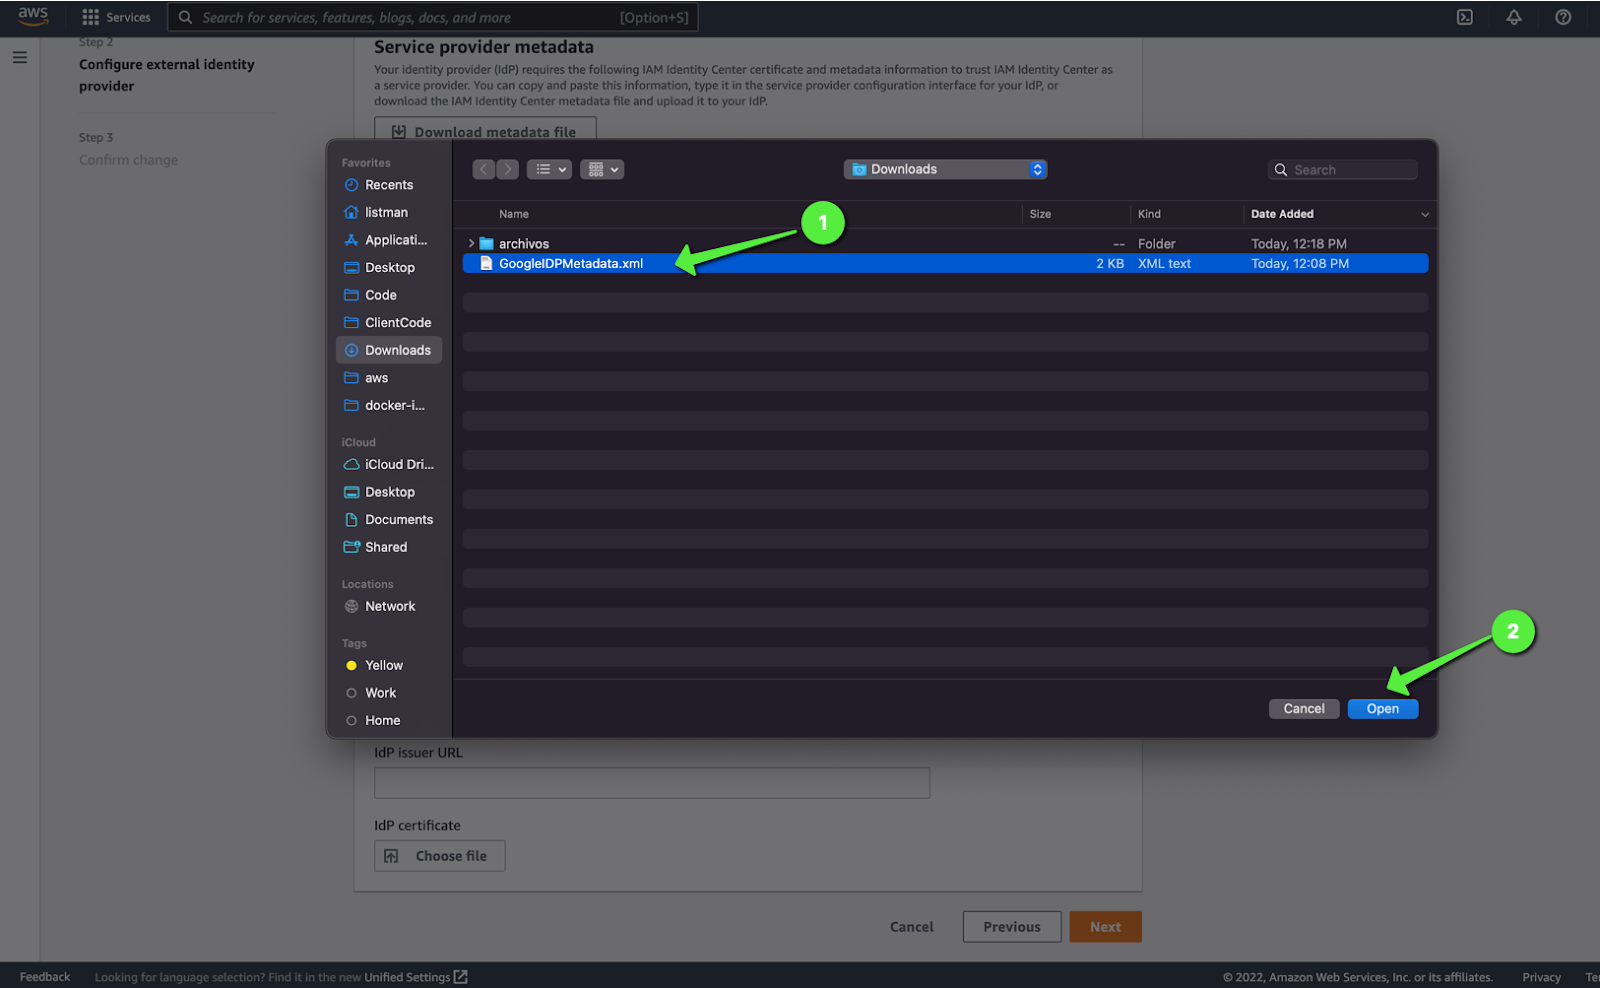
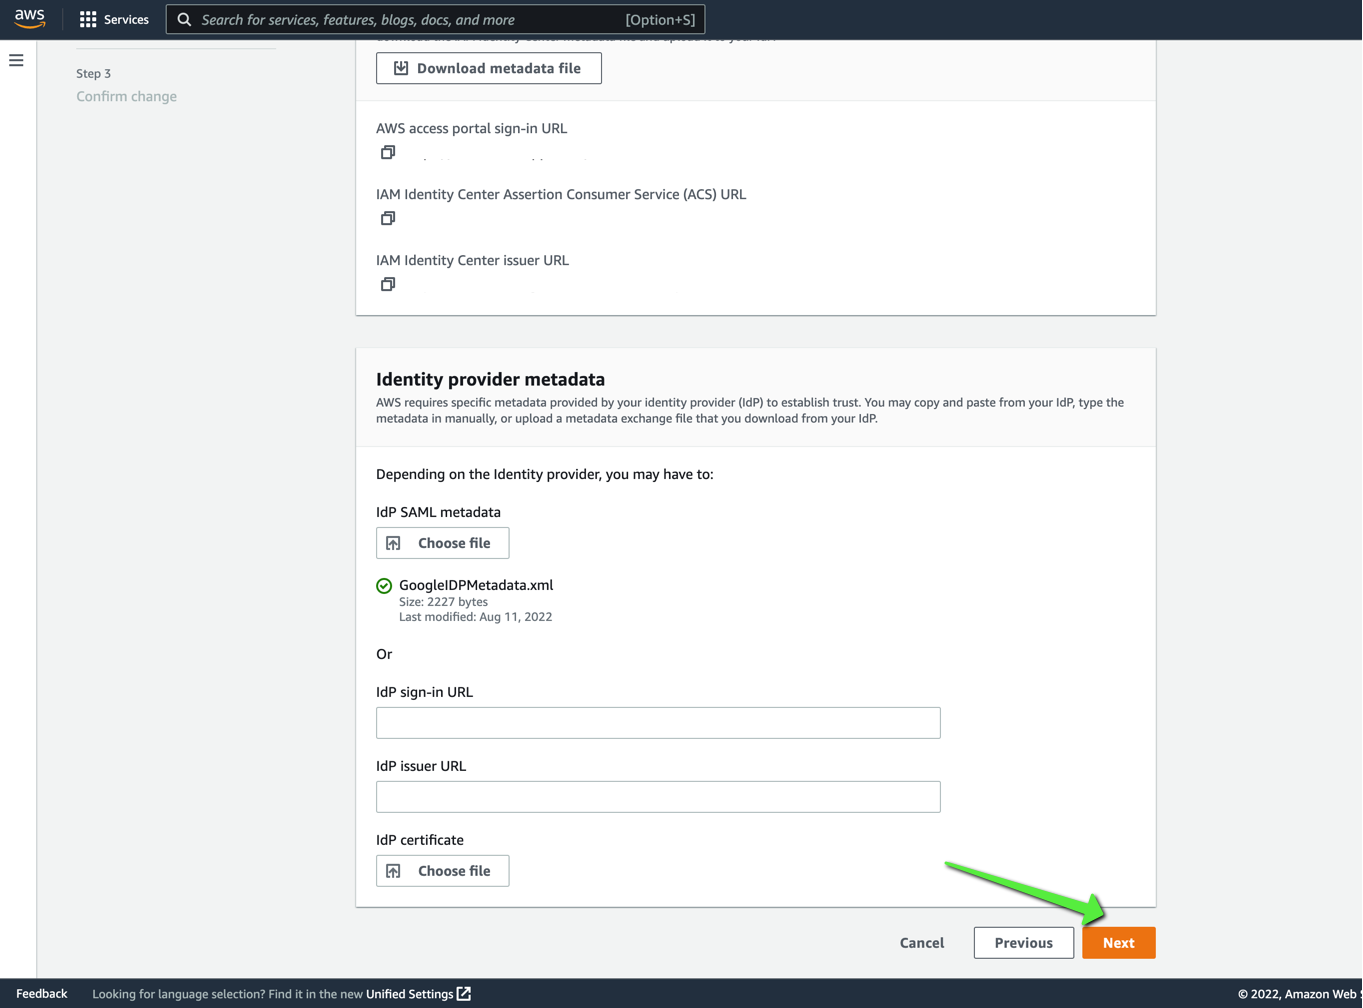
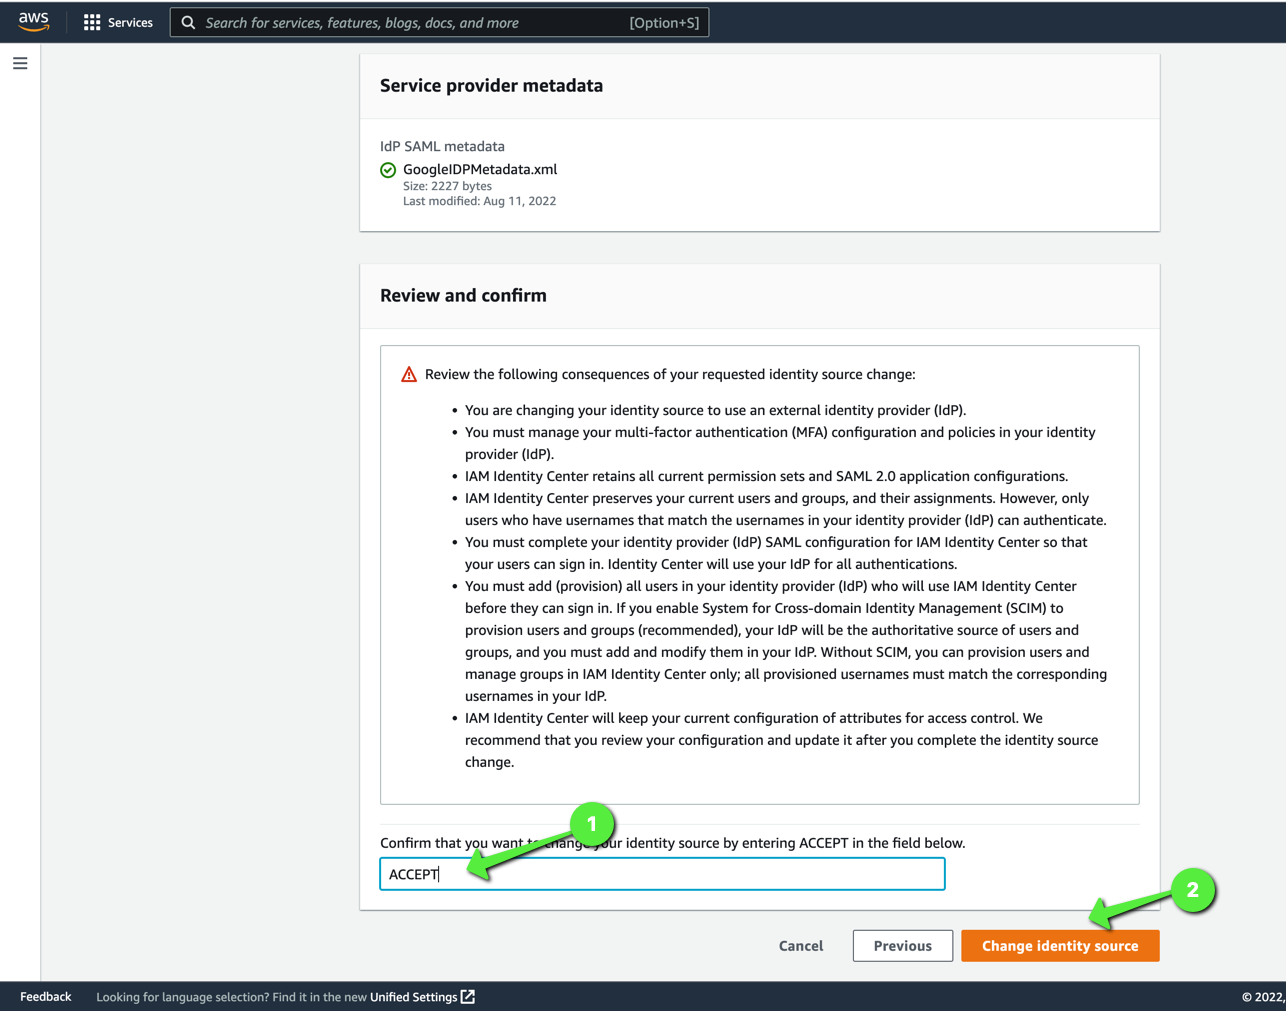
2.11 Go back to the AWS tab and upload the configuration file we generated earlier.
3. SSO Link Configuration
This will make it easier for us to share the link when granting access to our users.
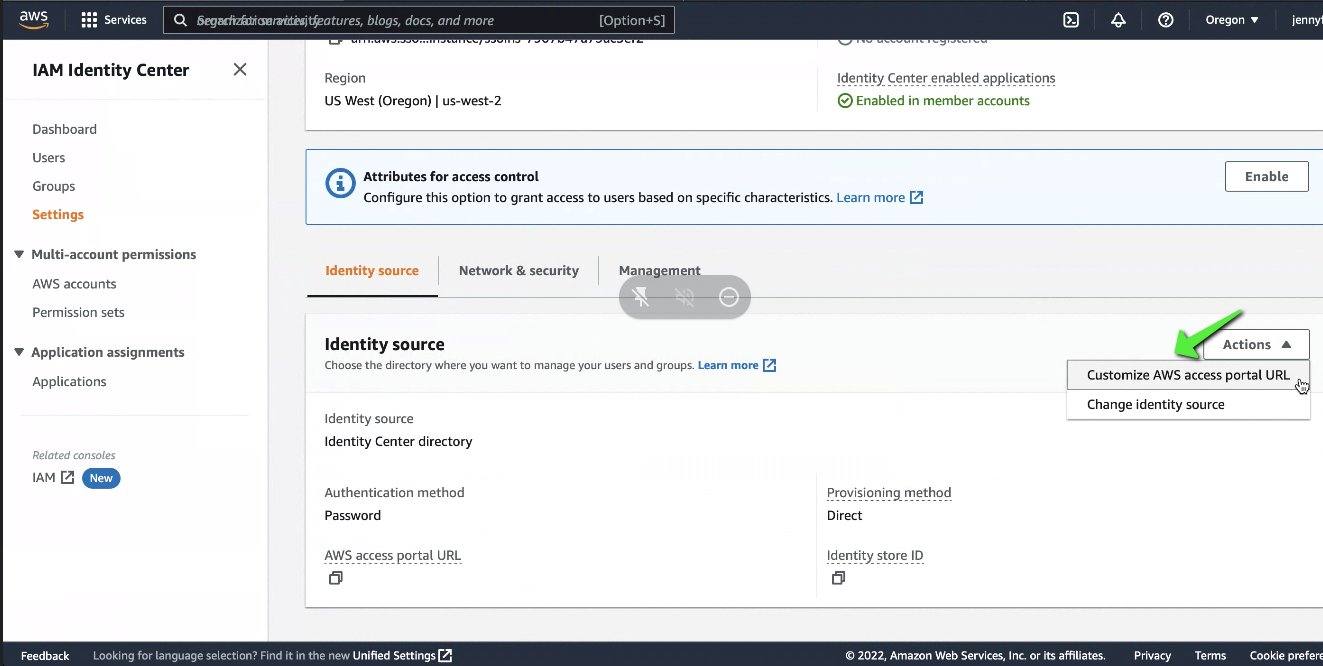
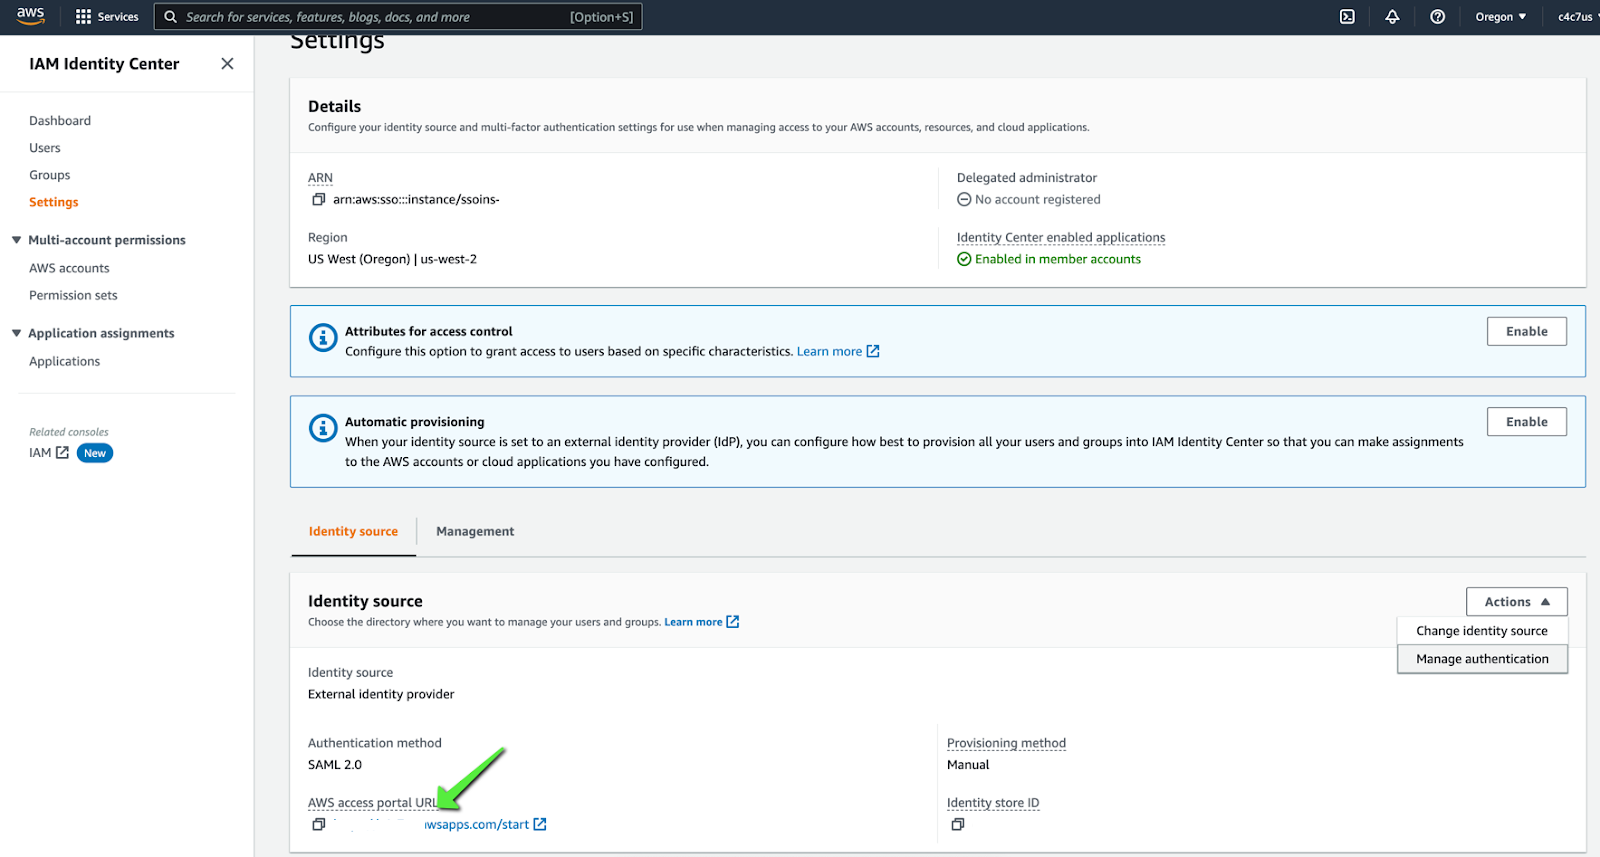
3.1 Go to the settings section in "AWS IAM" and click on "Actions" and then on "Customize AWS access portal URL".
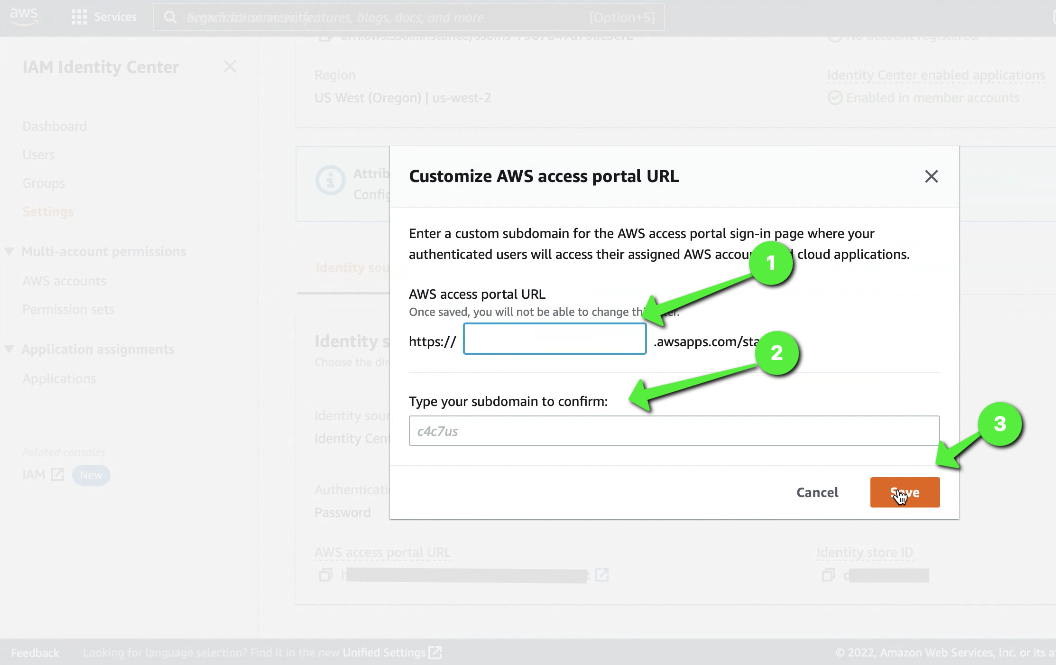
3.2 Enter a name that fits our company and save it.
After this, the configuration will be reflected.
4. AWS Group Configuration
In this section, we will create a group in "AWS IAM" to organize our users later.
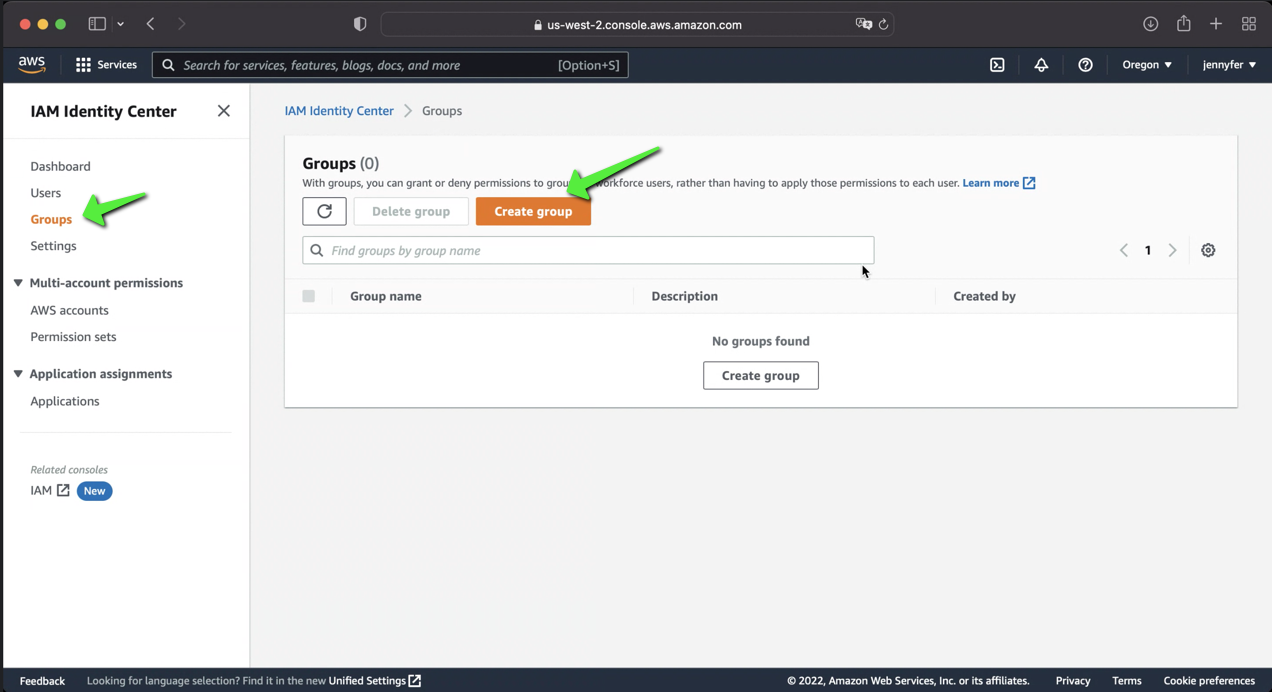
4.1 Go to "AWS IAM" and click on "Groups" and then on "Create group".
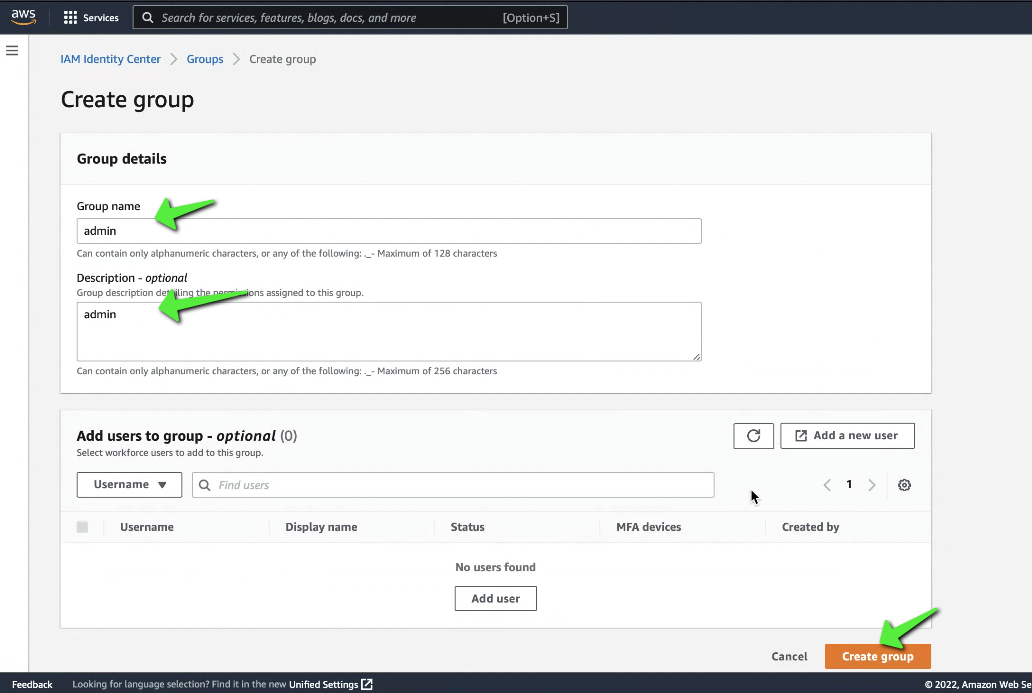
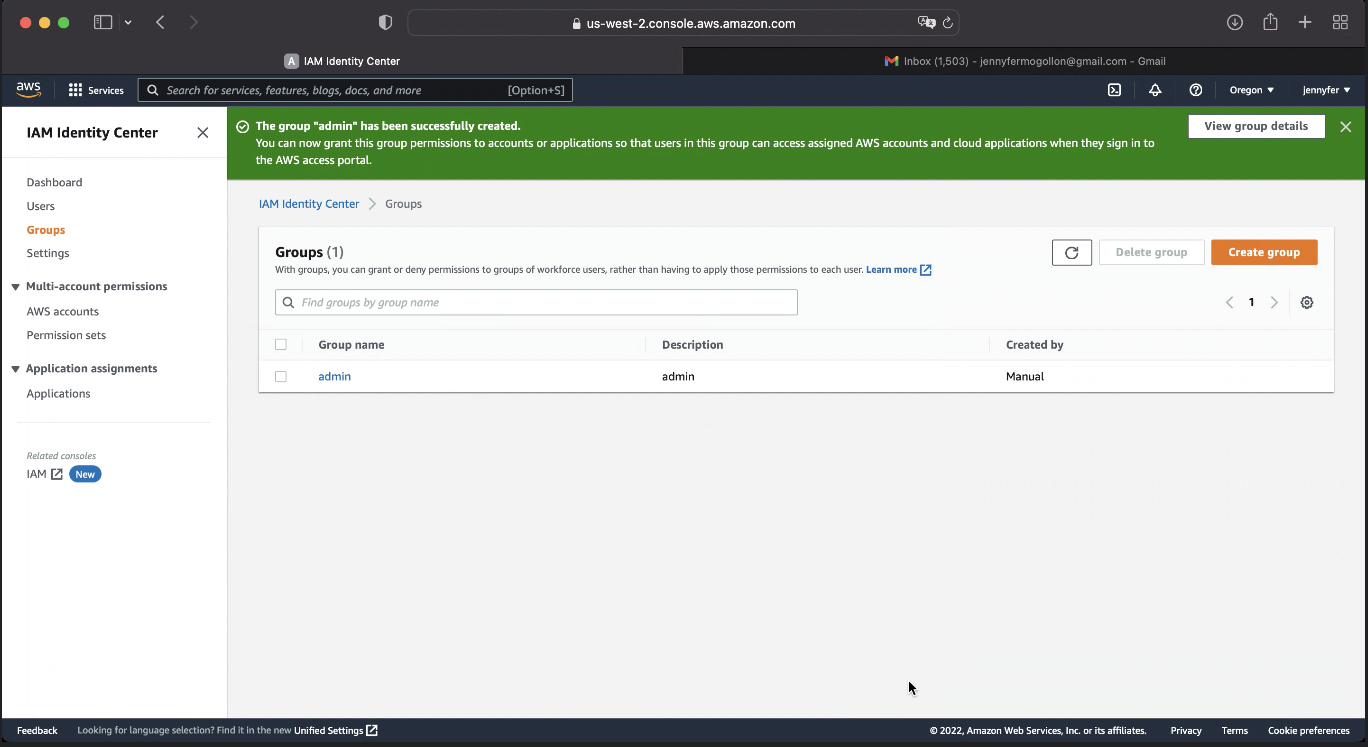
4.2 Configure the group and click on "Create group".
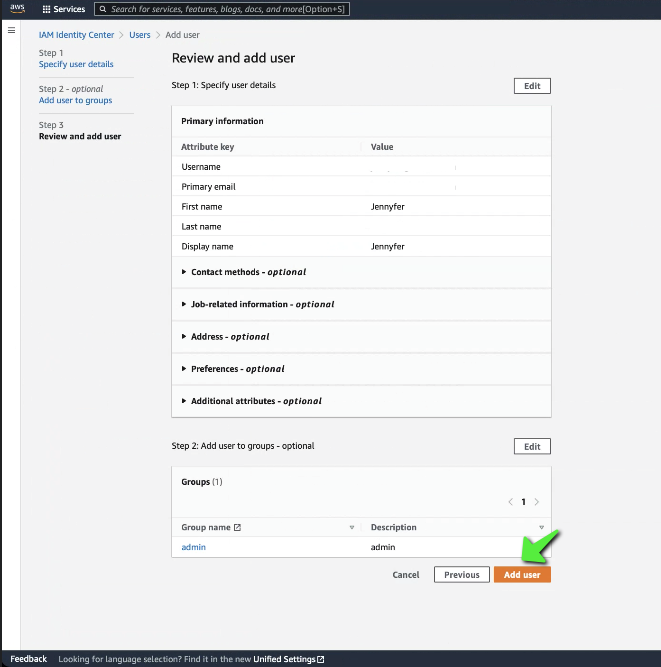
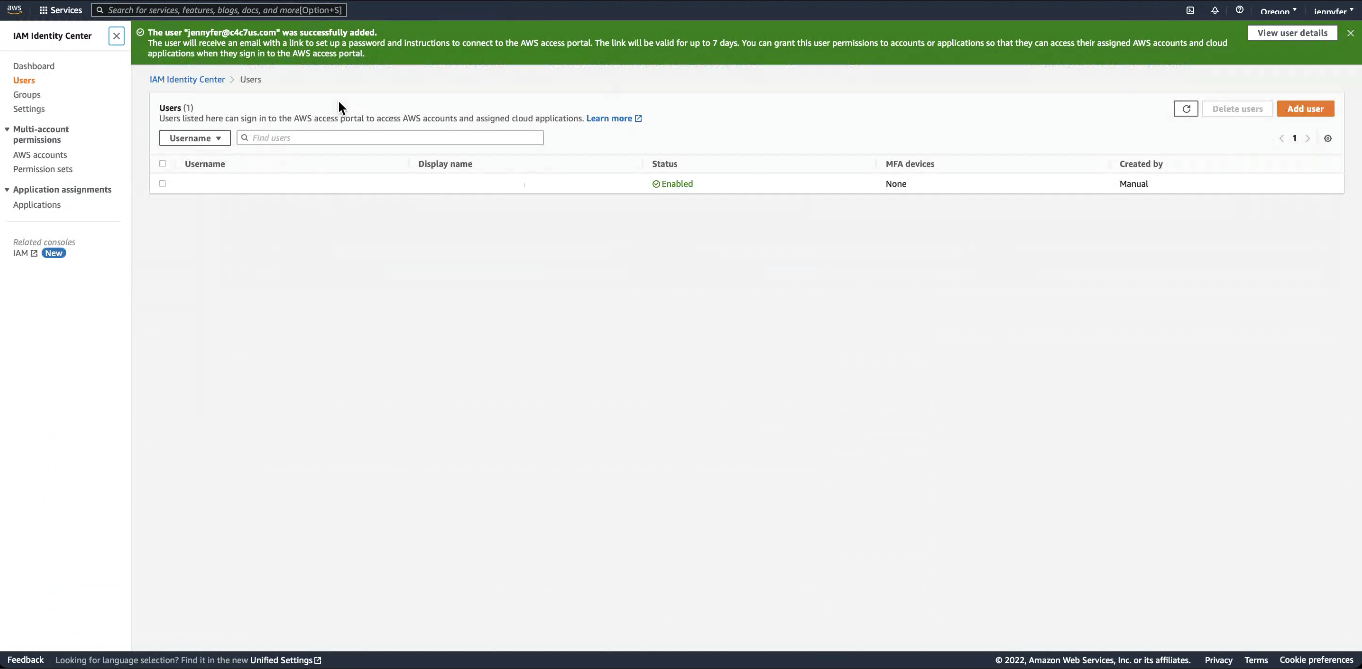
4.3 Go to "Users" and click on "Add user".
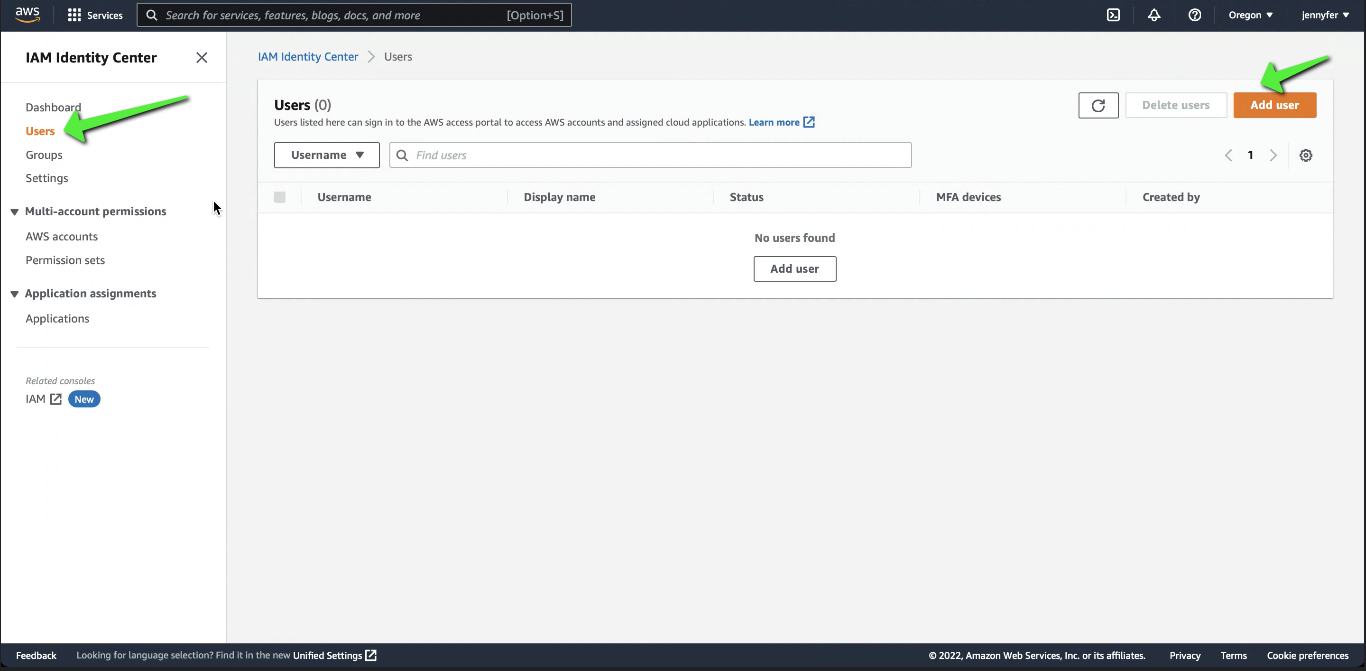
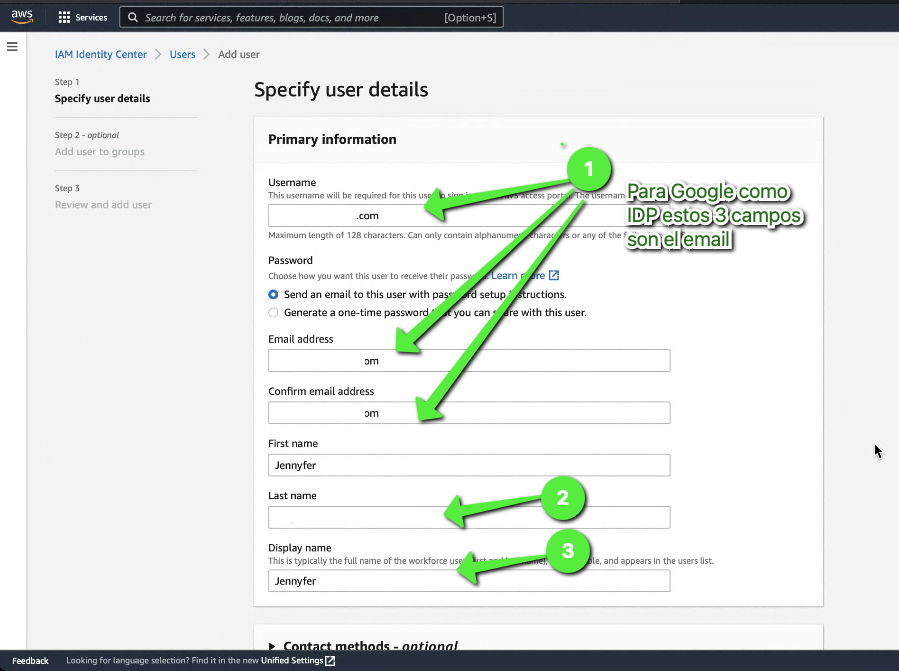
4.4 Configure the user information.
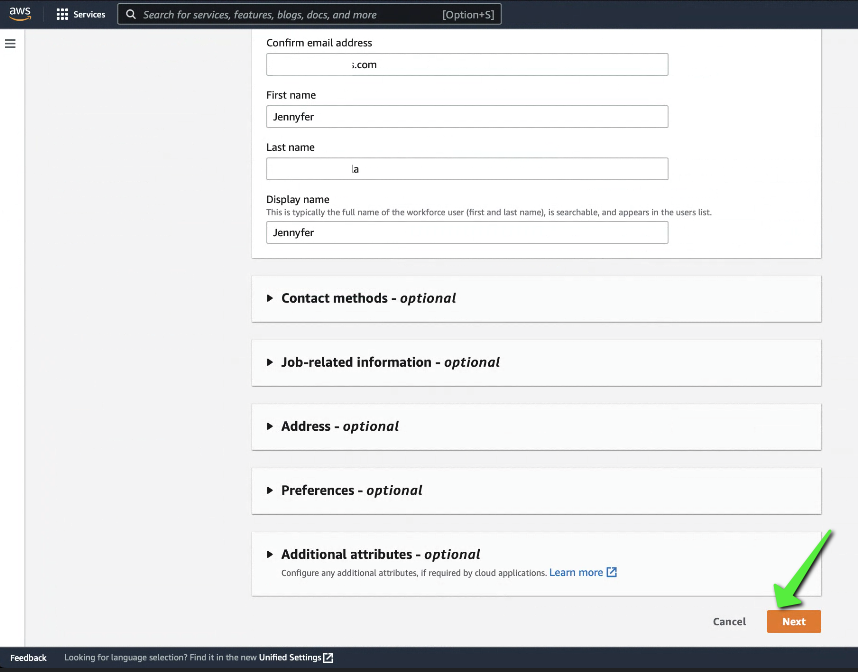
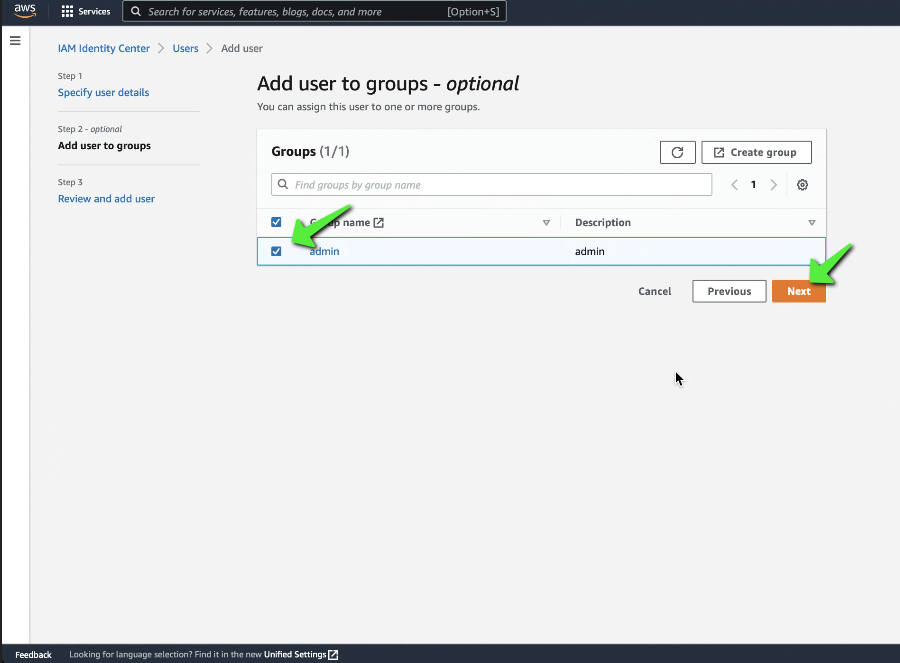
4.5 Click on "Next" and select the group where you want to add this information and confirm by clicking on "Add user".
5. Configure Group Permissions in AWS Single Sign-On (SSO)
The objective of this section is to establish what users we have created can and cannot do through permissions.
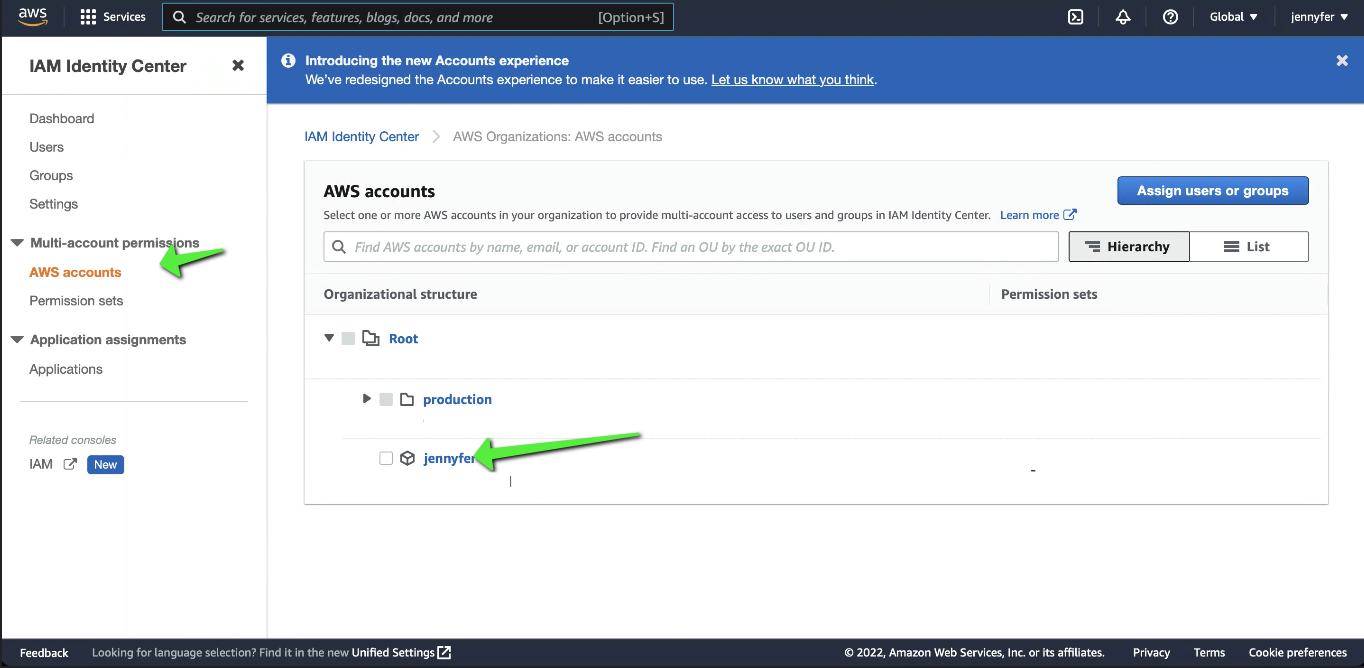
5.1 Go back to "AWS IAM" and go to the "AWS accounts" section, then select the user to configure.
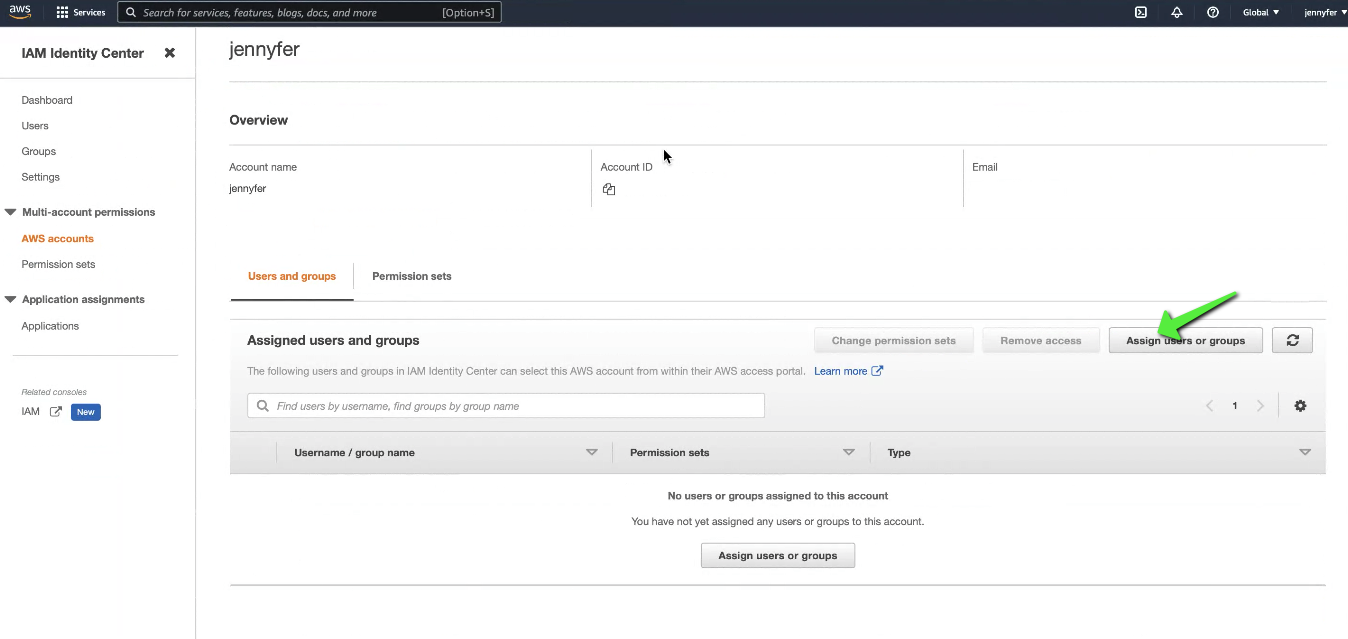
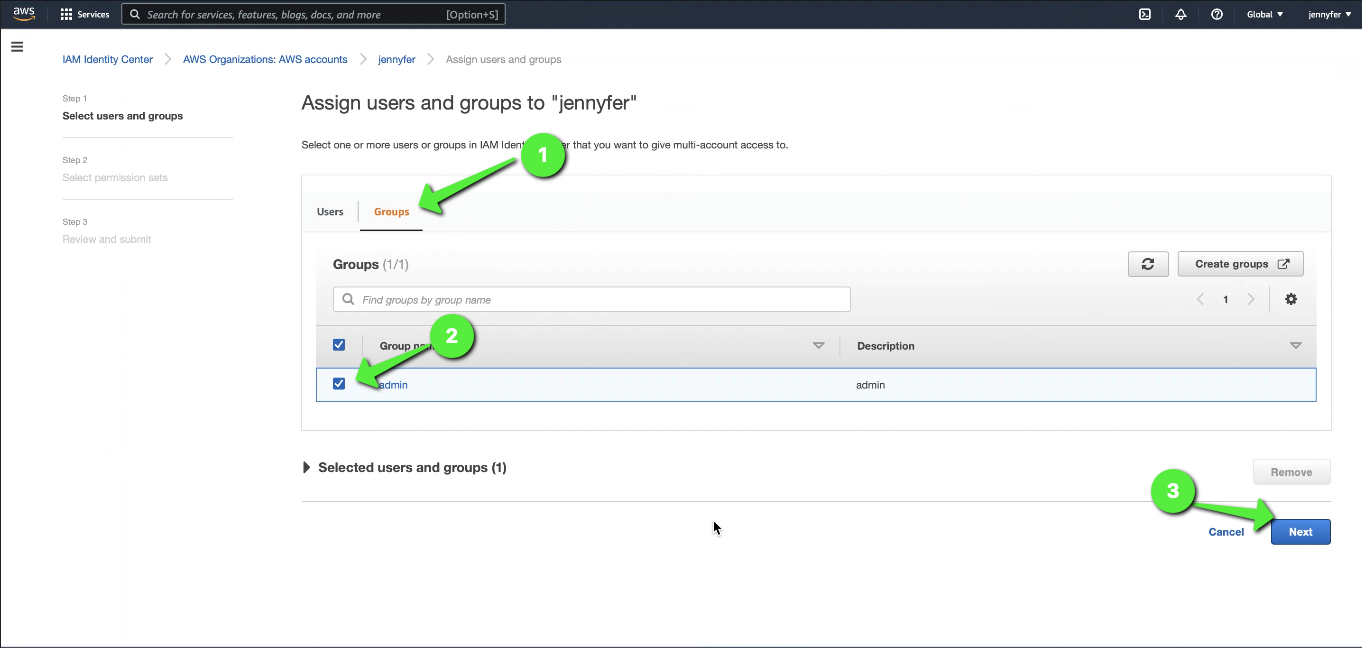
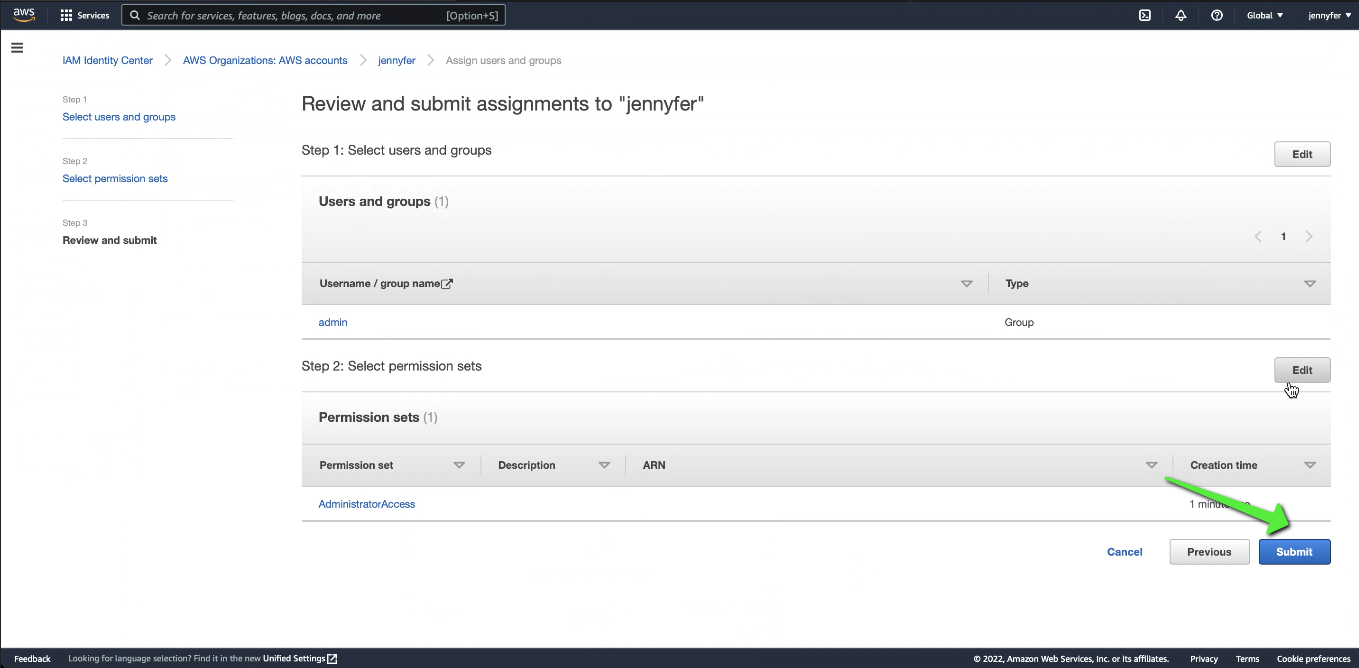
5.2 Click on "Assign user or groups", select the group, and click on "Next".
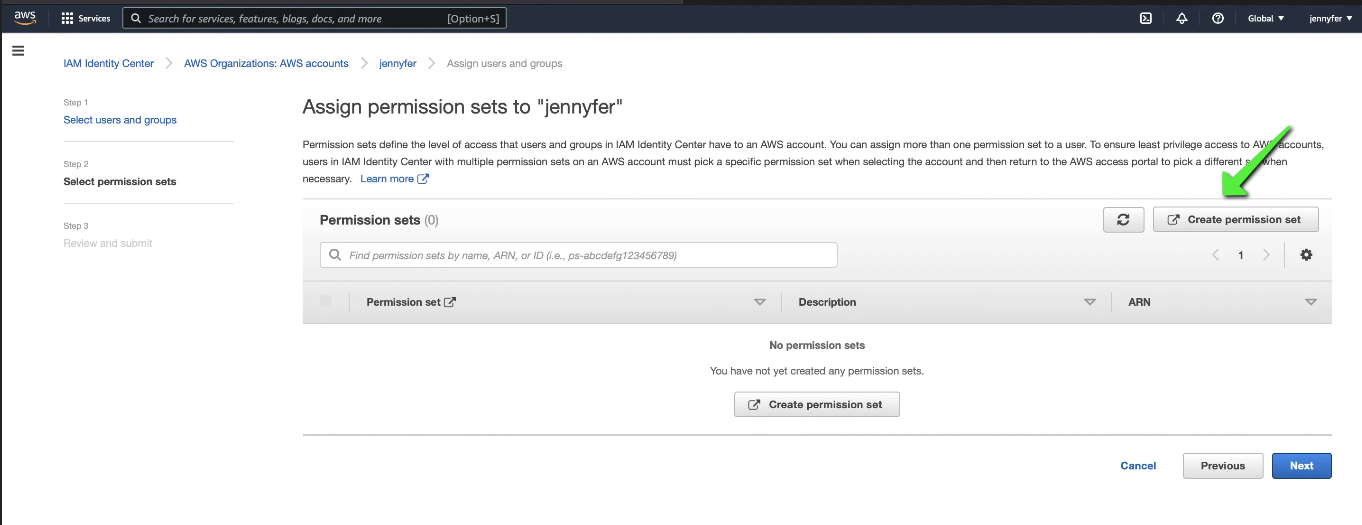
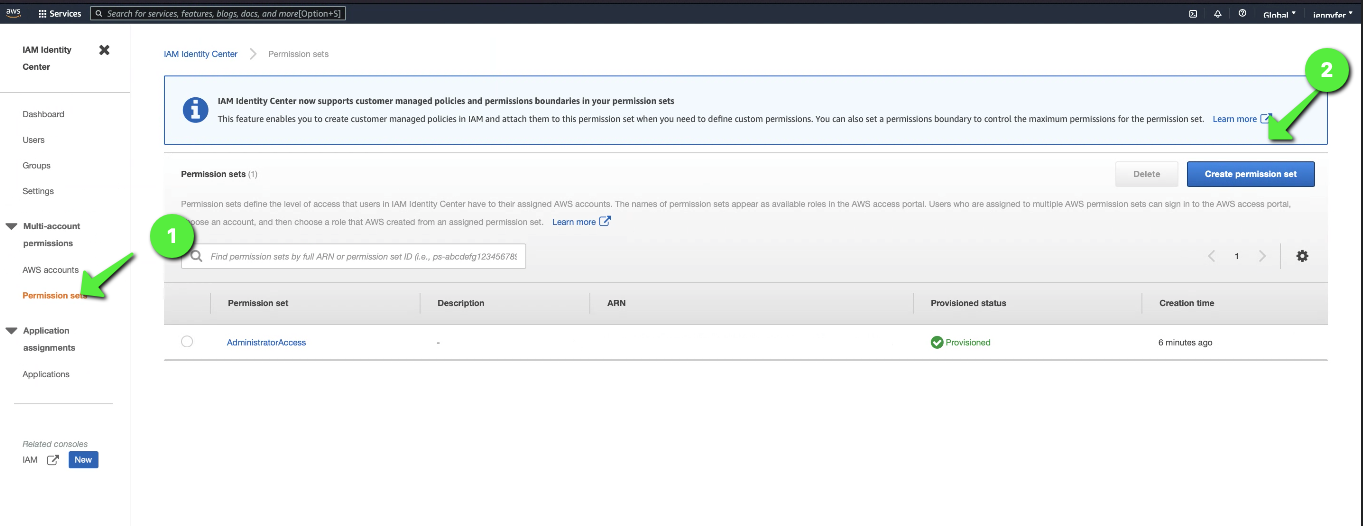
5.3 Click on "Create permission set".
This will open another tab where we will create two examples of permission groups depending on the freedom we want to give the user to interact with our cloud.
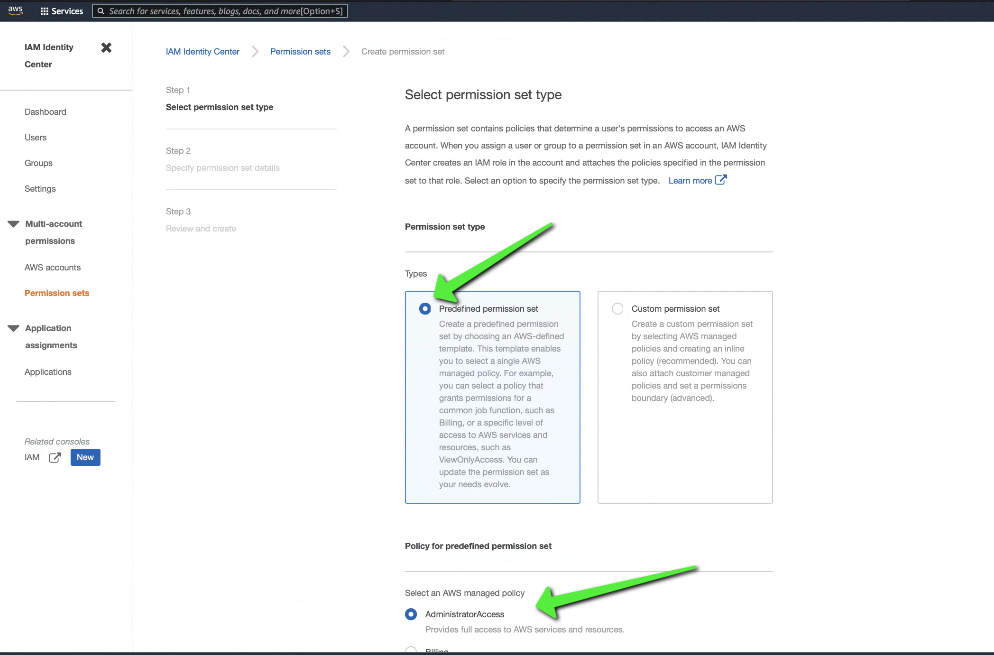
5.4 Example of permission configuration for an ADMIN user.
In this case, we will show a possible permission configuration if we want to give a user full access to our AWS console.
5.4.1 Select the options "Predefined permission set", "AdministratorAccess", and then click "Next".
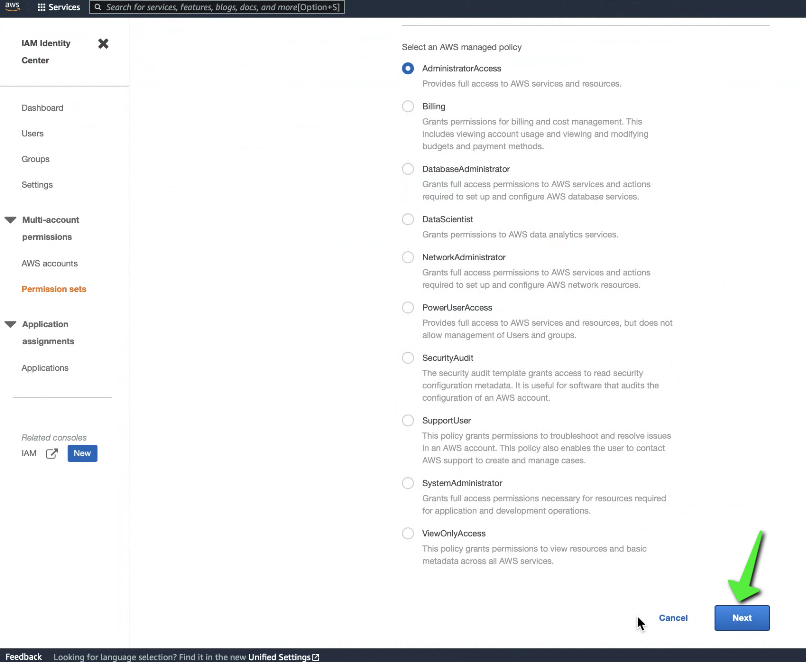
5.4.2 Leave the default configuration, click "Next", and then "Create".
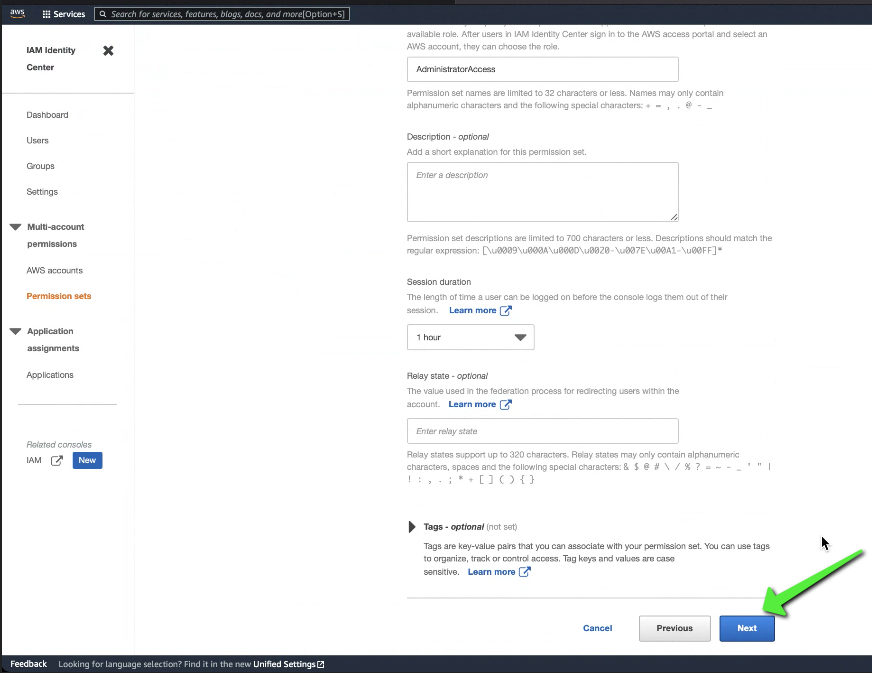
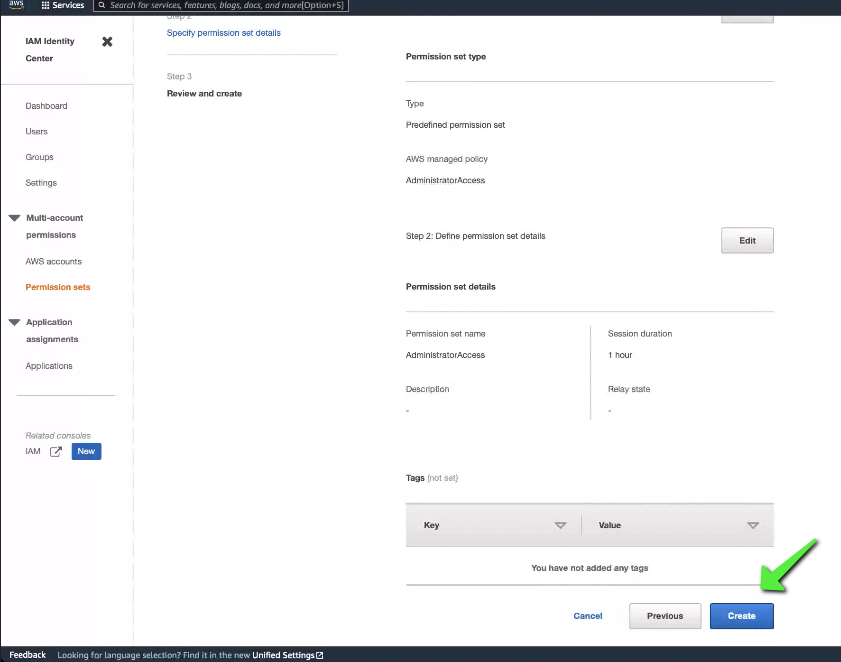
5.4.3 Here we can see the successful creation of the permission.
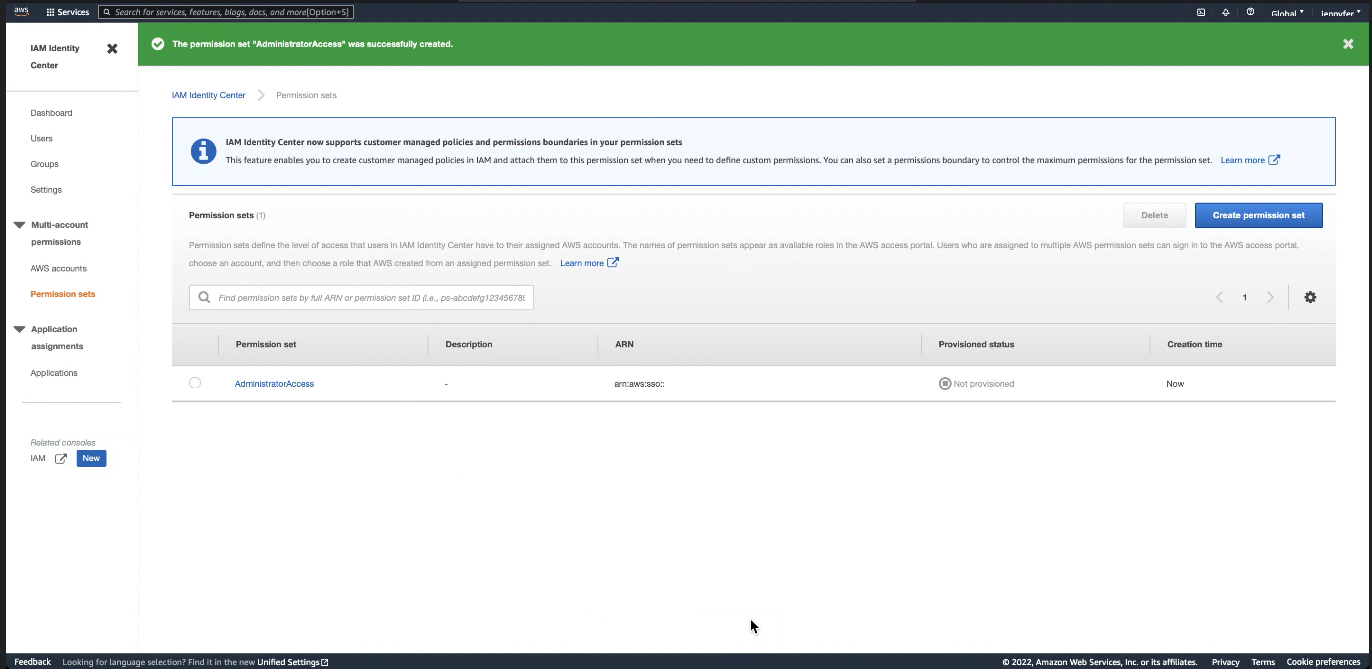
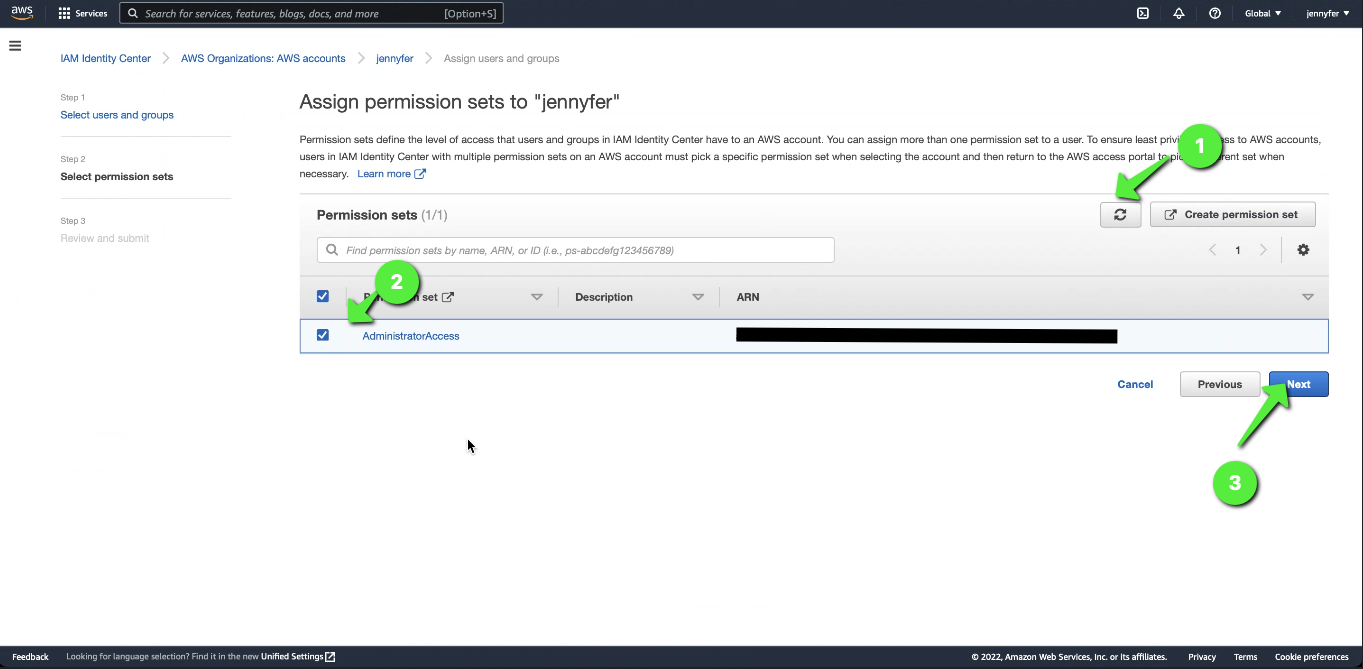
5.4.4 Go back to the user configuration tab in a group, refresh it, select our permission group, and assign it.
5.5 Example of permission configuration for a BACKEND user.
In this case, we will show a possible permission configuration if we want to give access only to certain specific functionalities for the developer's workflow.
5.5.1 Go back to creating a "Permission set".
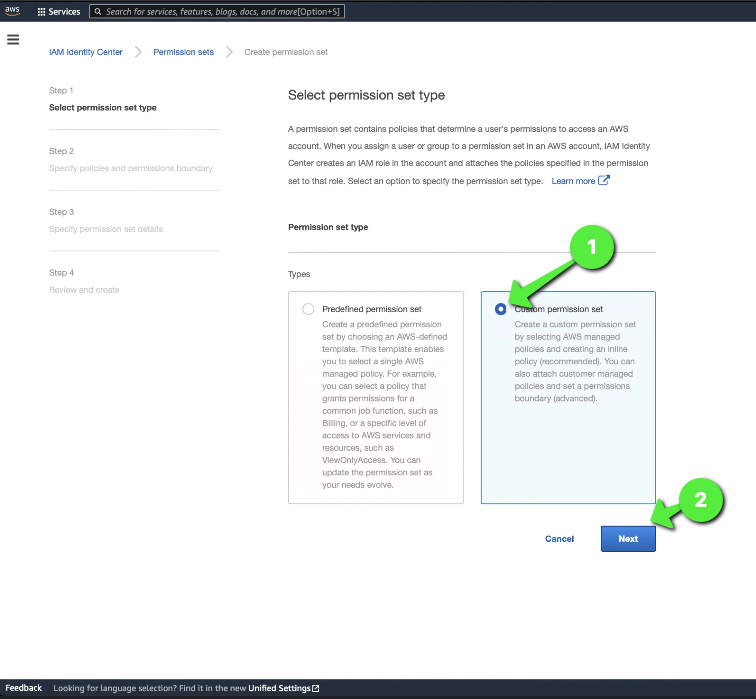
5.5.2 This time select "Custom permission set".
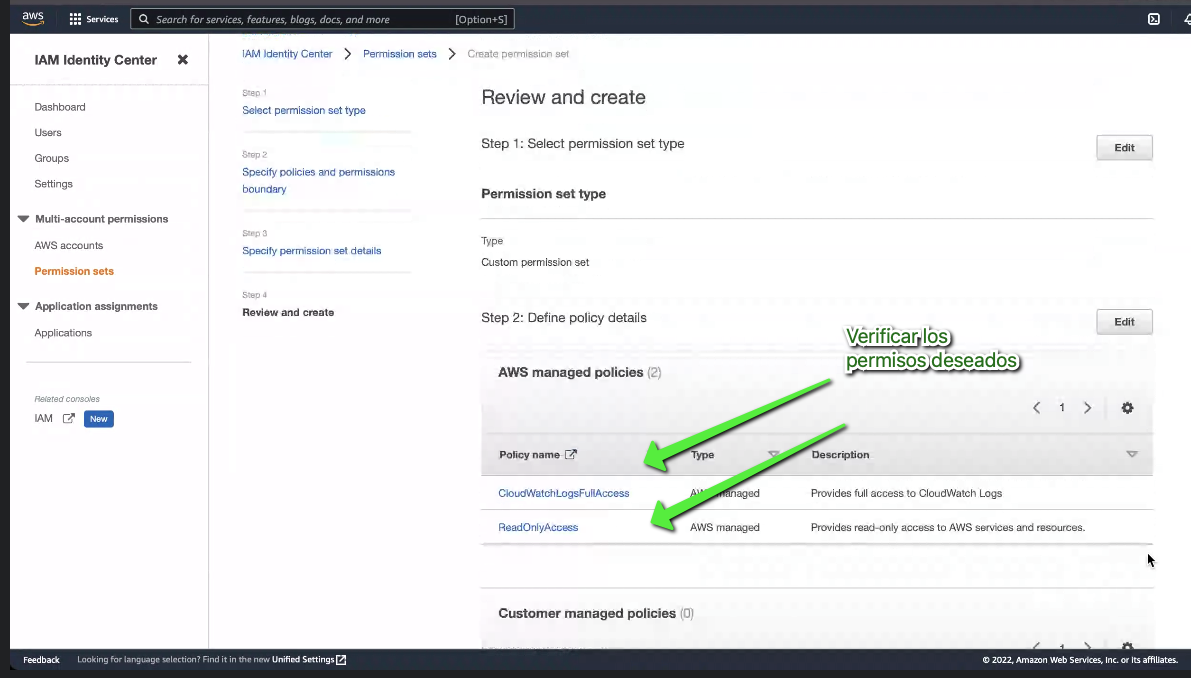
5.5.3 It will take us to select the policies we want to add, and we will look for "ReadOnlyAccess" as the first policy.
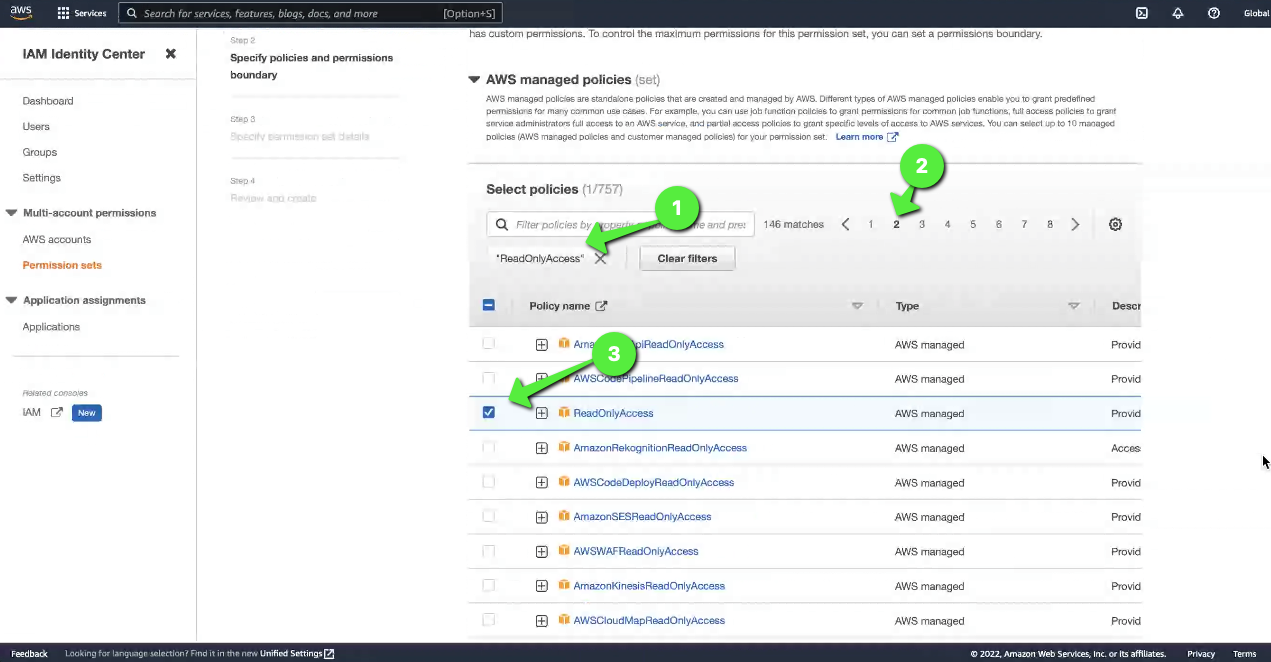
5.5.4 Then clear the filter and search for "CloudWatchLogsFullAccess".
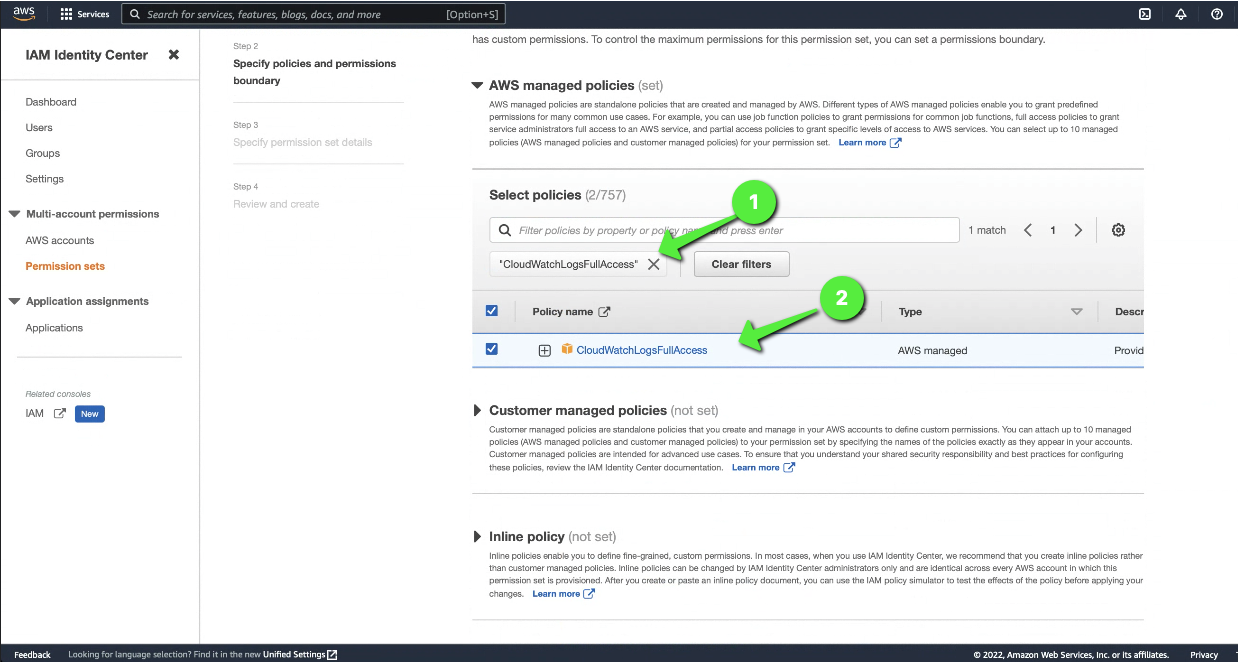
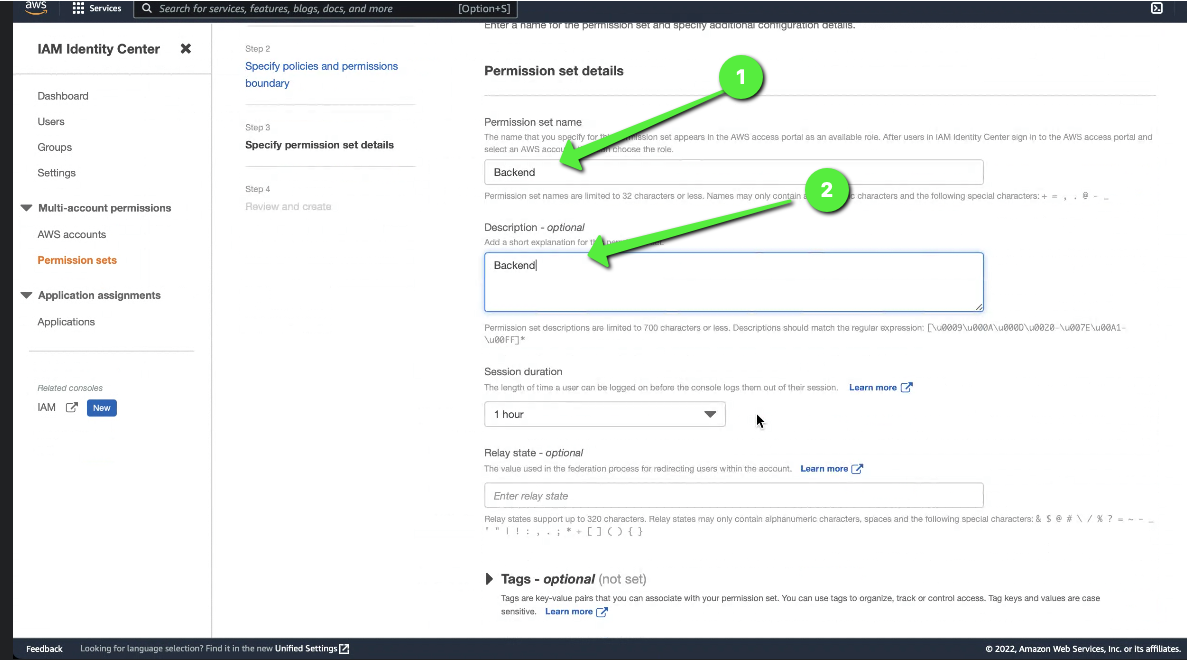
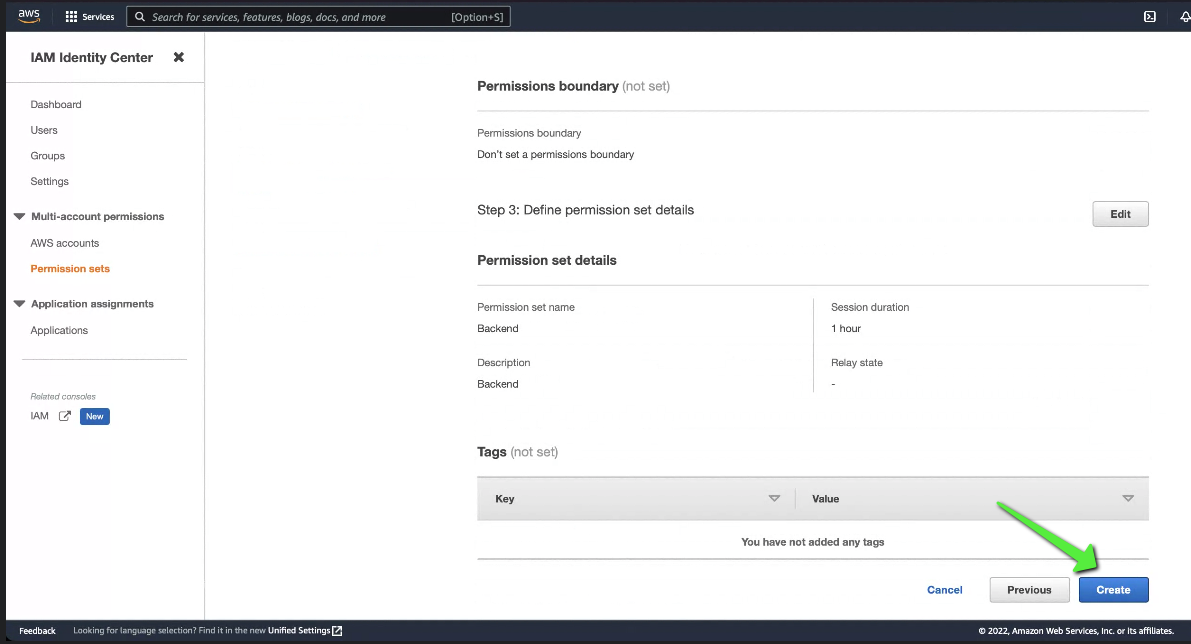
5.5.5 Click "Next" and assign a name and description to our "Permissions group".
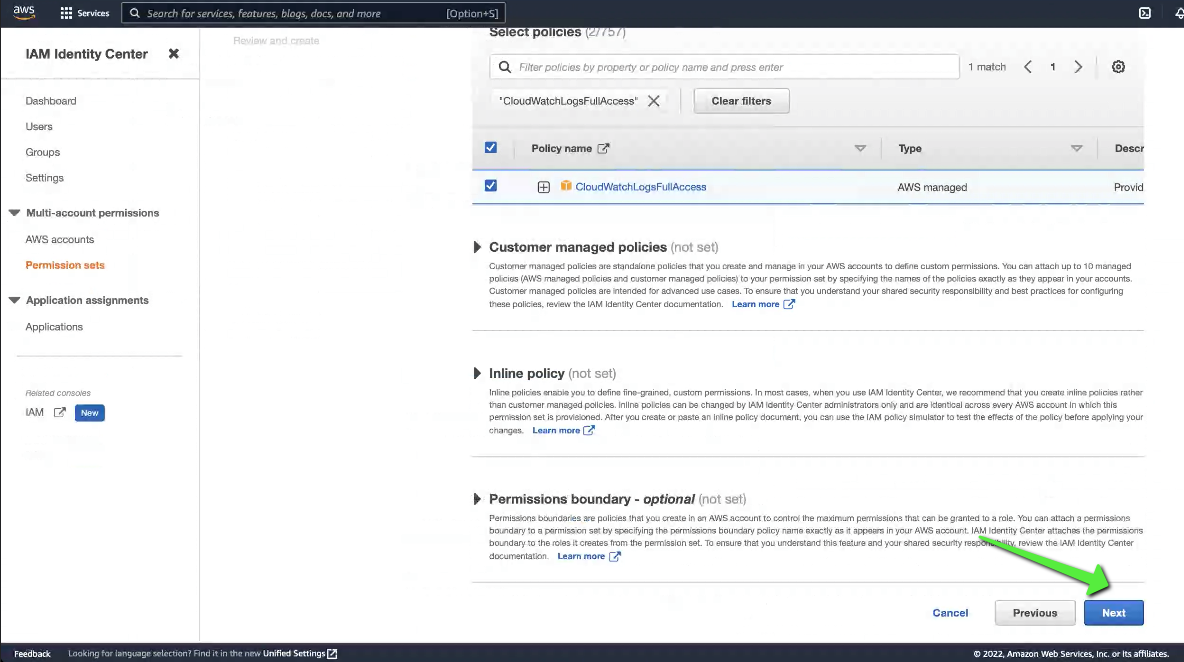
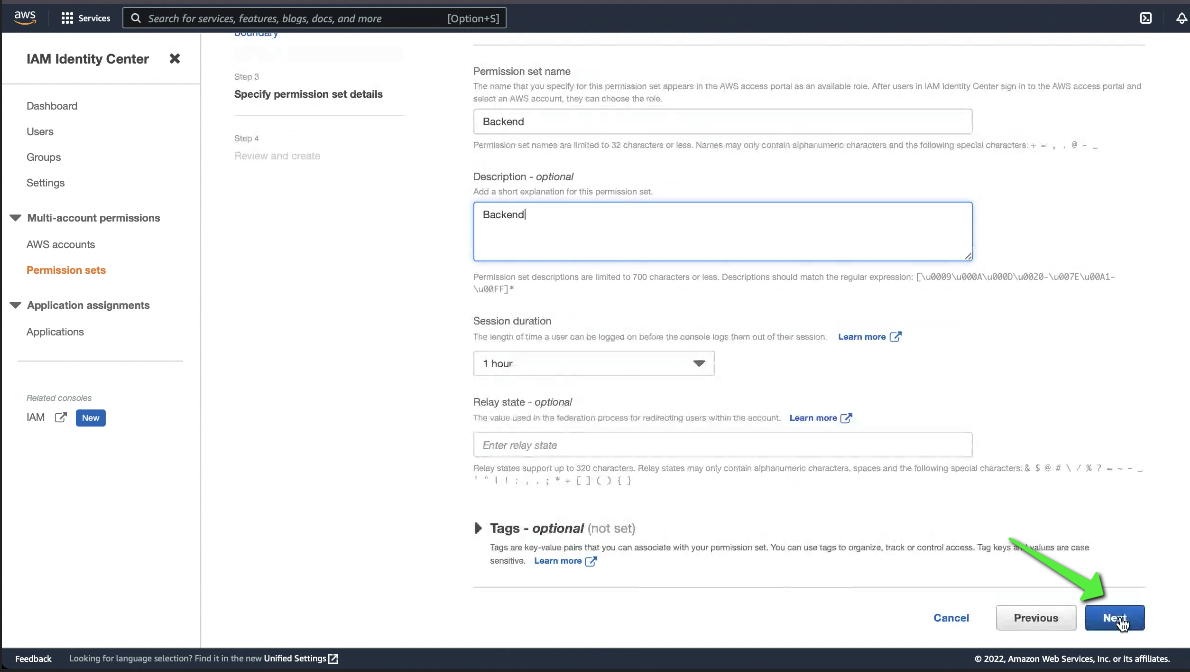
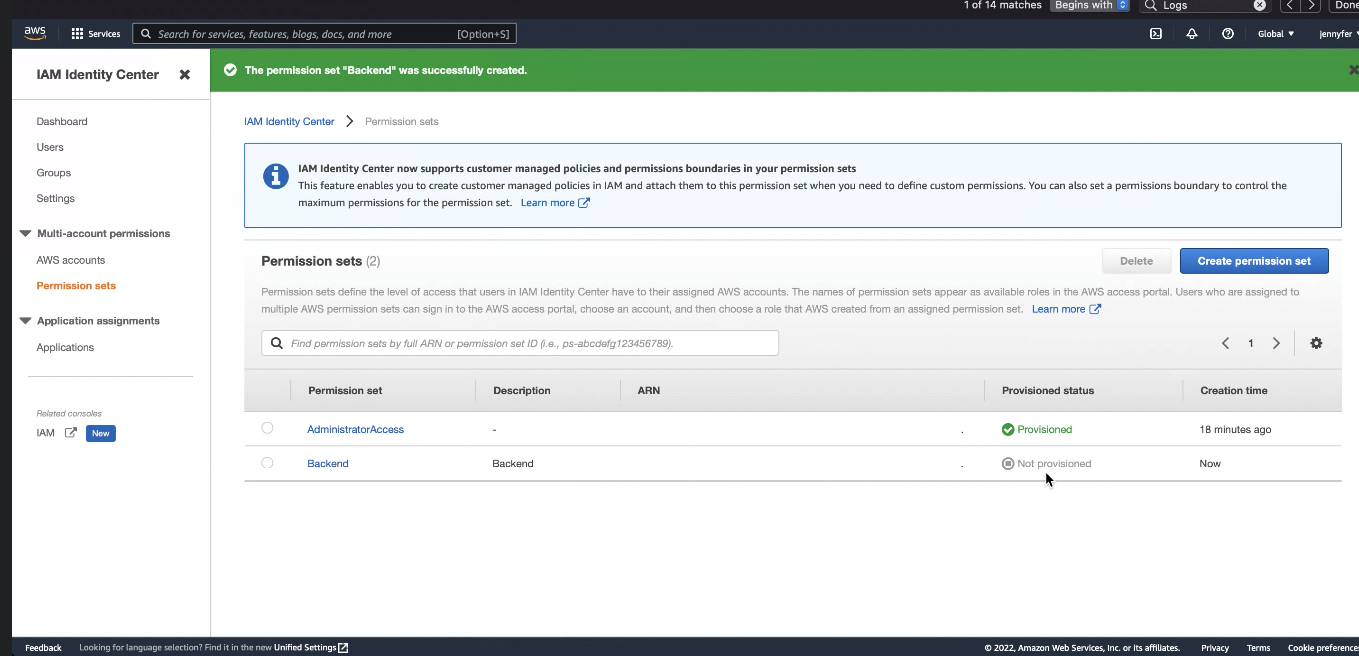
5.5.6 Finally, validate the policies we selected one last time and click "Create".
6. Conclusions.
After completing all the configuration steps, we will have a robust, solid, and scalable architecture of users, groups, and permissions in AWS. Now we are ready to take the next step: Connecting our console with C4C7OPS to enhance our projects with security, scalability, and monitoring.
You are now ready to discover the endless advantages that C4C7OPS can offer to your organization.